|
ƒGƒbƒOƒAپ[ƒg‚حژv‚¢‚جٹOگl‹C‚ھ‚ ‚èپA•`‚¢‚ؤ‚à•`‚¢‚ؤ‚à–ل‚¢ژè‚ھŒ»‚ê‚éپB
‚ب‚ج‚إ‘ٹ“–گ”•`‚¢‚ؤ‚à‘«‚è‚éژ–‚ح‚ب‚¢پB
’²ژq‚ةڈو‚ء‚ؤپA‚½‚ـ‚²‚جگH‚׉ك‚¬‚ة‚ح’چˆسپB
‰؛‚حپAFree‚إŒِٹJ‚³‚ê‚ؤ‚¢‚éDisney‚ج“h‚èٹGپB
ƒ^ƒ}ƒS‚ةƒvƒٹƒ“ƒg‚µ‚ؤ‚ف‚½پBپ@پi’†گg‚حگو‚ة”²‚¢‚ؤ‚ ‚éپj


‰ن‚ھ‰ئ‚ج2“ْ•ھ‚ج‚½‚ـ‚²ڈء”ï—تپB
ƒ^ƒ}ƒS‚ة•`‰و‚·‚é‚و‚èپAƒGƒbƒOƒXƒ^ƒ“ƒh‚ًƒvƒٹƒ“ƒg‚·‚éژٹش‚ج•û‚ھ’·‚¢پI
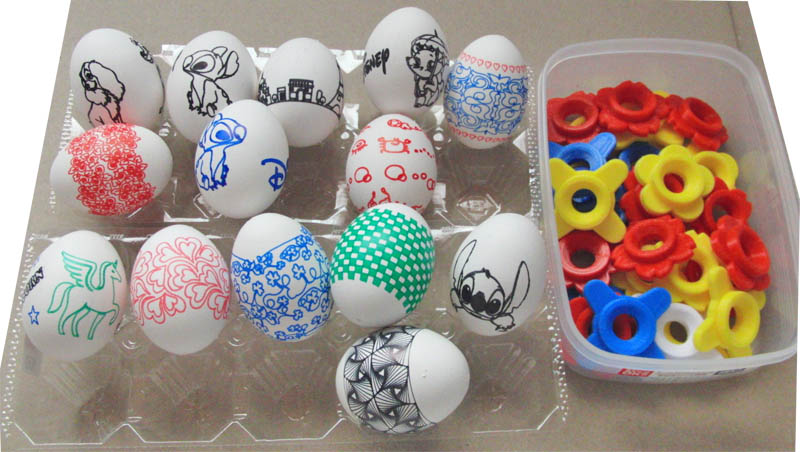
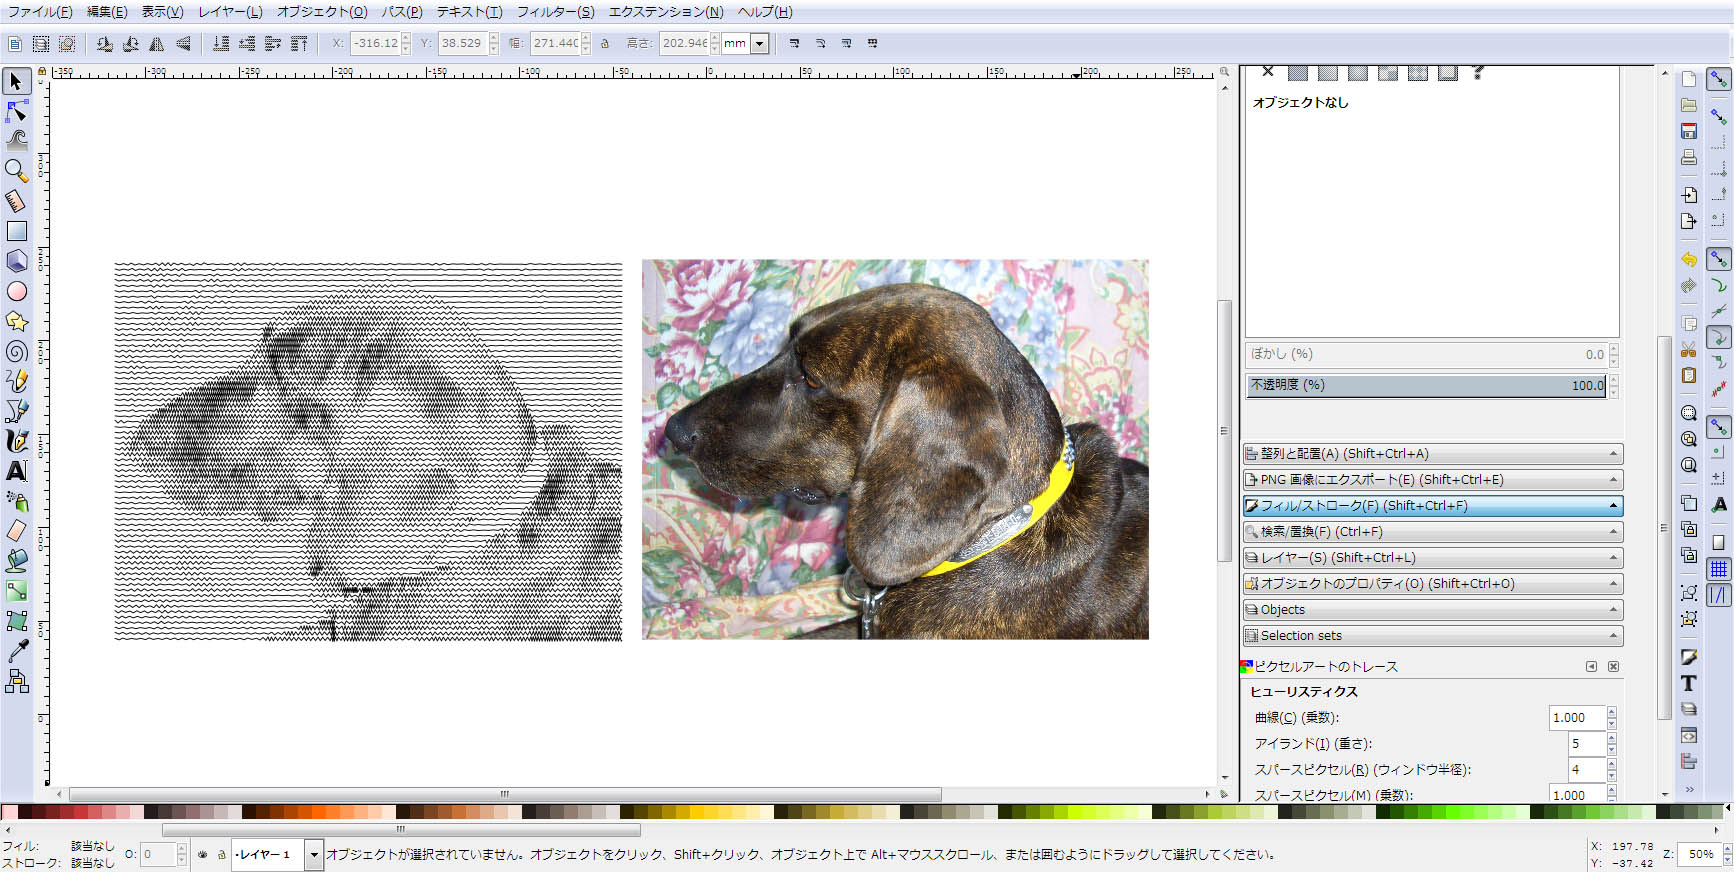
‚¢‚آ‚جٹش‚ة‚©100ˆبڈم‚جگ}•؟ƒfپ[ƒ^پB
پEپE‚¨‹C‚ة“ü‚è‚جٹG‚âƒpƒ^پ[ƒ“‚ةڈW’†‚µ‚ھ‚؟پB
 “Y•tƒtƒ@ƒCƒ‹
|
|
|
|
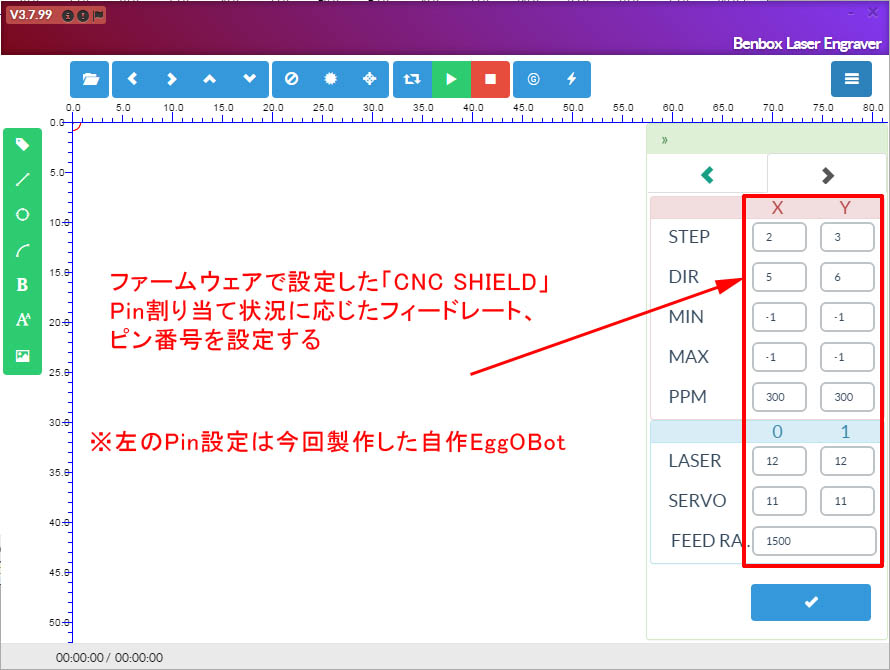
ƒtƒٹپ[‚جƒŒپ[ƒUپ[’¤چڈƒ\ƒtƒgپuBenboxپv‚إEggBot—p‚جGCODE‚ھ“®چى‚·‚é‚©ژژ‚µ‚ؤ‚ف‚½پB
پuBenboxپv ƒ_ƒEƒ“ƒچپ[ƒhƒTƒCƒg
ژ©چى‹@‚ةچ‡‚ي‚¹‚ؤPin‚ًگف’肵‚½ŒمپAgcode‚ًژو‚èچ‚ٌ‚إژہچs‚µ‚ؤ‚ف‚éپB
گف’è‰و–ت1

CNC SHIELD‚ةچ‡‚ي‚¹‚½گف’è‰و–ت2
’چˆسپIپF‰؛‚ج‰و‘œ’†پA–{—ˆ"‰E‚جگشکg"‚ئڈ‘‚©‚ب‚¯‚ê‚خ‚ب‚ç‚ب‚¢‚ئ‚±‚ë‚ًŒë‚ء‚ؤ"چ¶"‚ئ•\‹L‚µ‚ؤ‚µ‚ـ‚ء‚½‚½‚ك‚±‚±‚إ’ùگ³پB
Œ‹‰ت‚حگ¸“x‚ً‘¹‚ب‚¤ژ–‚ب‚–³ژ–“®چىپB
EggBot‚ًژہچs‚إ‚«‚éƒ\ƒtƒg‚ھ‚ـ‚½ˆê‚آ‘‚¦‚½پB
“Y•t‚µ‚½mp4“®‰و‚حژہچغ‚ة‰ز“‚³‚¹‚½—lژqپi“™‘¬پj
چ،‰ٌ‚جژہچs‚µ‚½پuEggBotپv—p‚جGCODE‚à“Y•tپi•زڈW–³‚µ‚إ‚±‚ج‚ـ‚ـژہچsپj
“Y•tƒtƒ@ƒCƒ‹
|
|
|
|
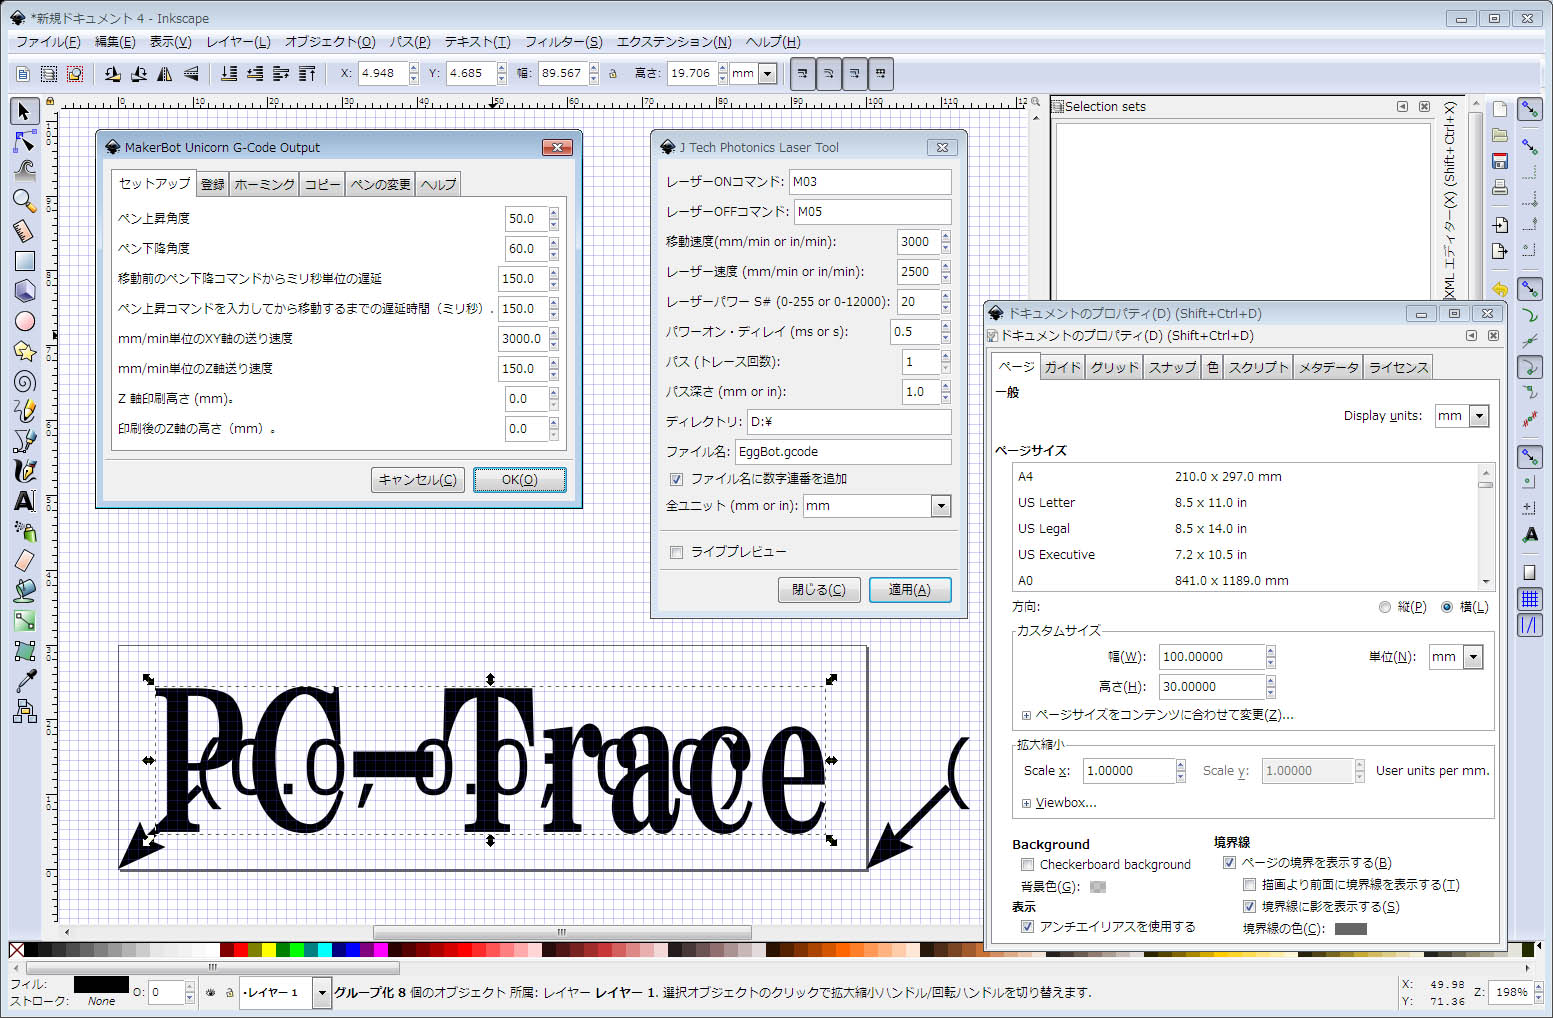
EggBotپAAxiDrawپALaser—p
Photoپ¨ƒxƒNƒgƒ‹ƒfپ[ƒ^•دٹ·ƒeƒXƒg
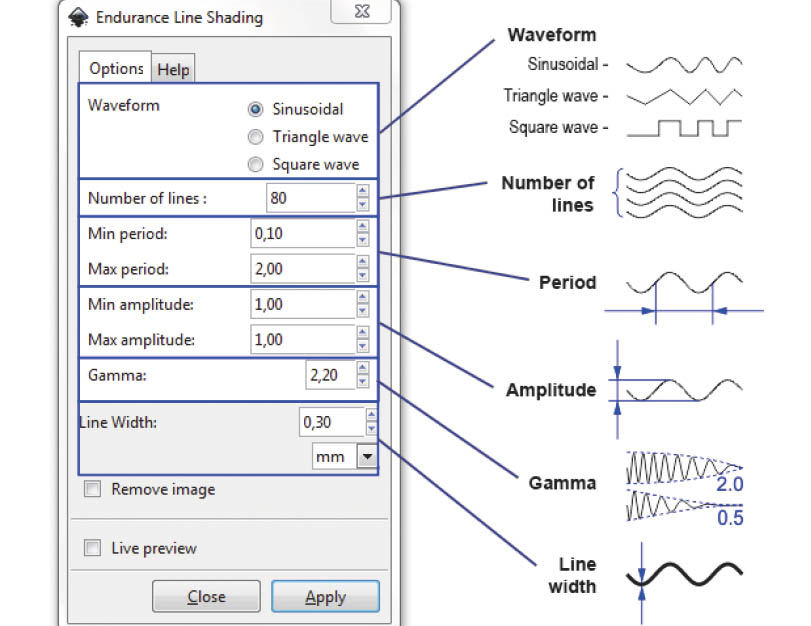
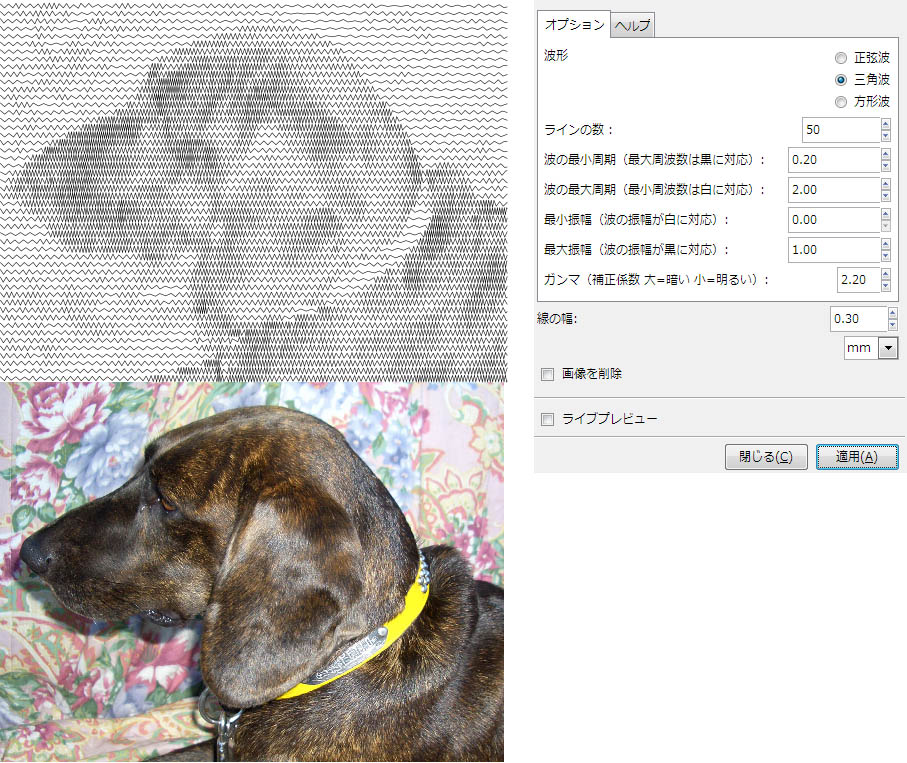
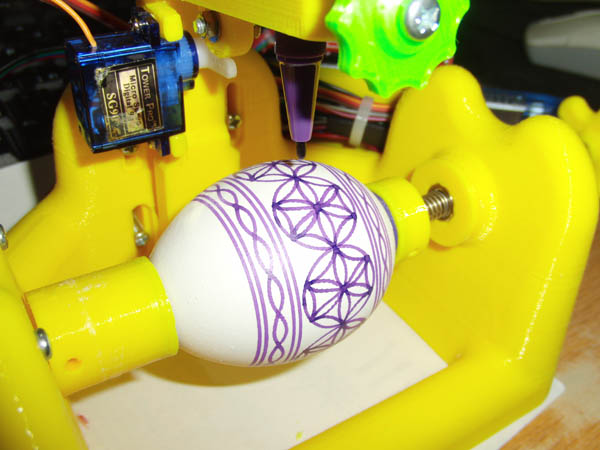
”gŒ`‚ًپuگ³Œ·”gپvپAپuژOٹp”gپvپAپu•ûŒ`”gپv‚ج3‚آ‚ج’†‚©‚ç‘I‘ً‚إ‚«‚éپB
ƒ‰ƒWƒI‚ج”gŒ`پEژü”gگ”‚ئژ—‚½چl‚¦‚ة‚ب‚é‚ھپAگU••د’²پAژü”gگ”•د’²پAچX‚ة–¾ˆأ‚ًƒKƒ“ƒ}•âگ³ŒWگ”‚إ’²گ®‚µ‚ؤ–ع“I‚ج ƒ‰ƒXƒ^ƒxƒNƒ^پ[‰و‘œ‚ًچىگ¬‚·‚éپB
Inkscape‚جExtension‚©‚çگف’èƒ_ƒCƒAƒچƒO
‰و‘œڈo“TپF http://endurancelasers.com/
ژہچغ‚ة‚â‚ء‚ؤ‚ف‚½—ل
گف’è”نٹr
 http://endurancelasers.com/
|
|
|
|
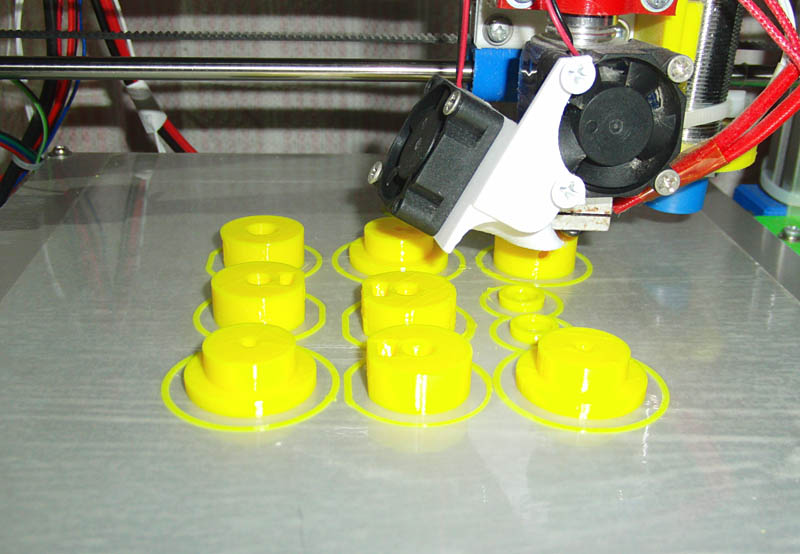
ƒ^ƒ}ƒS‚ج”²‚«ڈo‚µژہ‘H•زژتگ^پB
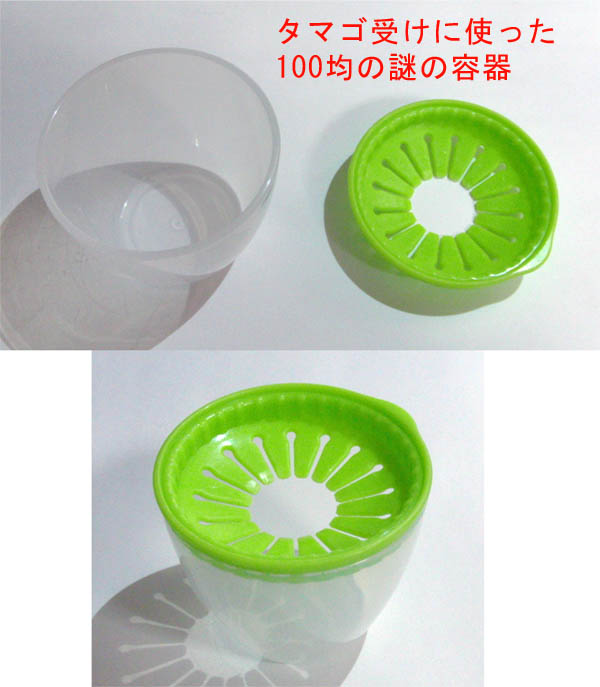
—eٹي–¼‚ھ•s–¾‚جƒJƒbƒv
پi‚»‚جŒمƒyƒbƒgƒ{ƒgƒ‹—p‚جƒRƒbƒv‚إ‚ ‚éژ–‚ھ”»–¾پj
ڈo“TپF
https://macaro-ni.jp/41919
ƒ^ƒ}ƒS‚ًڈو‚¹‚é
ƒzپ[ƒ€ƒZƒ“ƒ^پ[‚إچw“ü‚µ‚½‰و•e‚ً‚ن‚ء‚‚è‚ئژh‚·

ژو‚èڈo‚µ‚½ƒ^ƒ}ƒS‚ح—â‘ Œة‚ة“ü‚ꂸپA‚·‚®‚ة’²—‚µ‚ؤگH‚ׂéپI
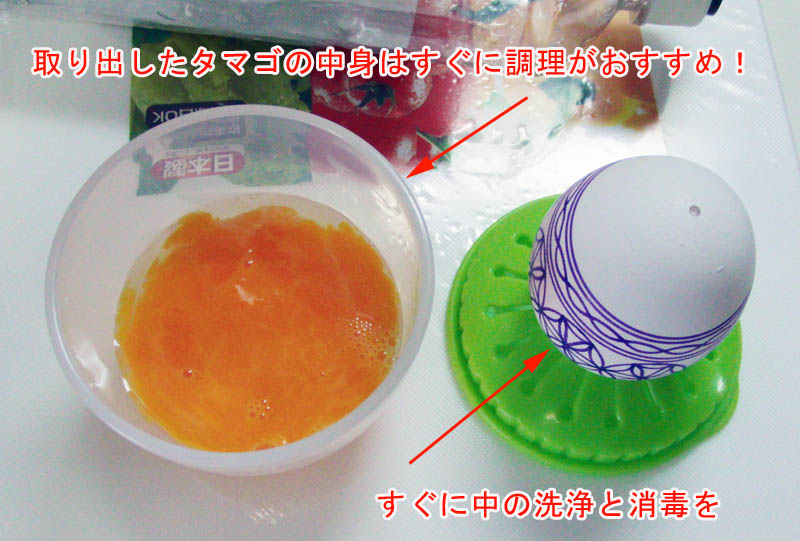
’†گg‚ً”²‚¢‚½ٹk‚جگôڈٍŒم‚حڈ[•ھ‚ةگ…‚ًگط‚ء‚ؤٹ£‘‡‚³‚¹‚éپB
ŒoŒ±ڈمپAٹ£‘‡‚ة‚حٹغˆê“ْ‚©‚©‚éپB
|
|
|
|
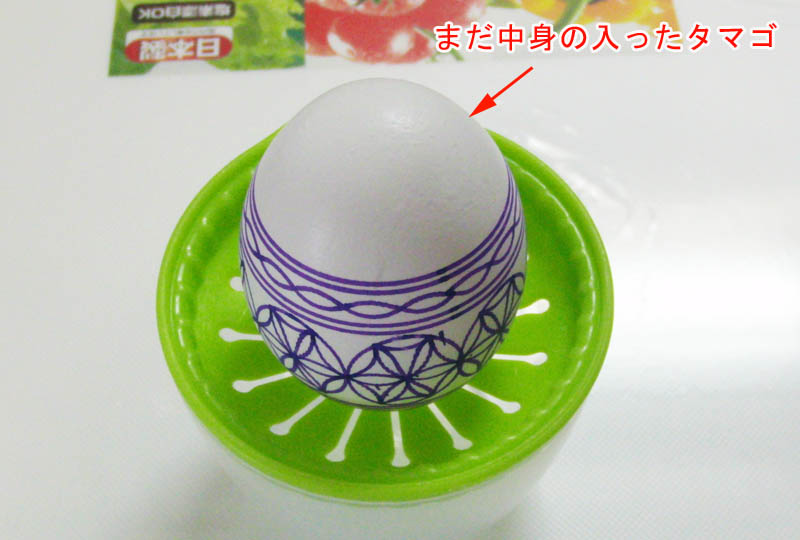
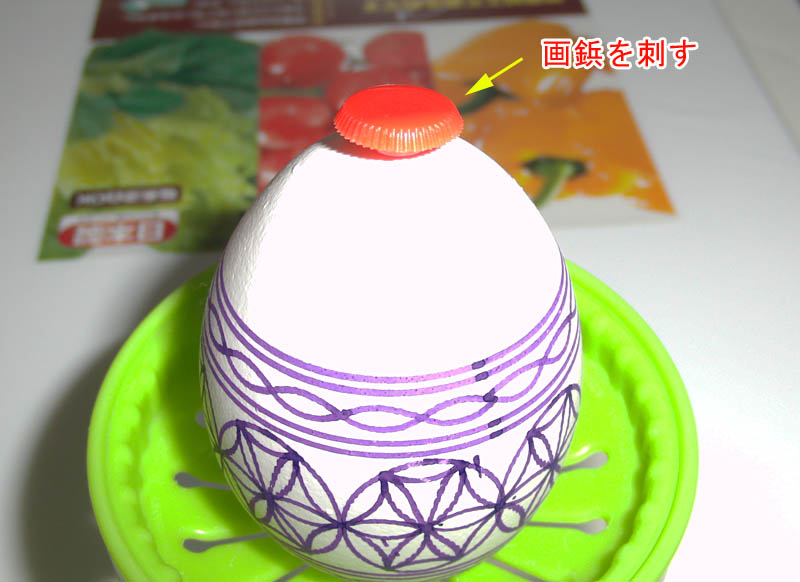
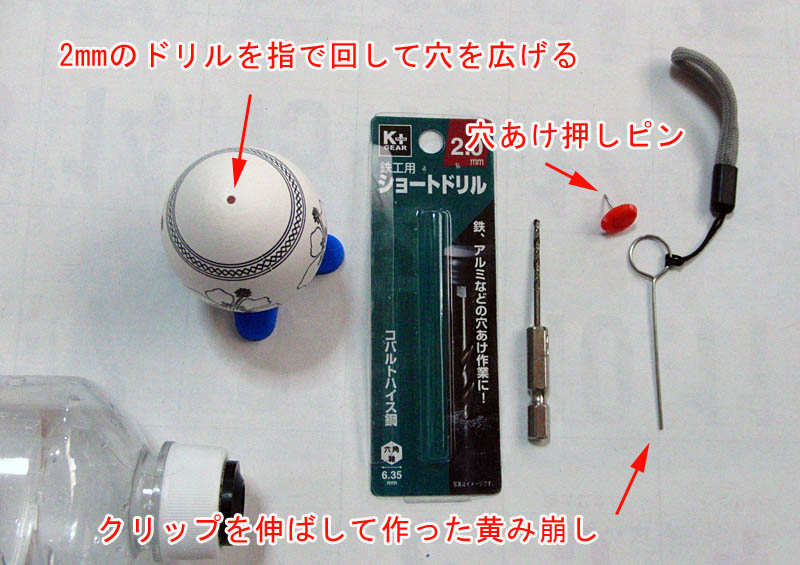
EggBot‚ة•`‰و‚µ‚½‚ ‚ئ‚جƒ^ƒ}ƒS‚ج’†گg”²‚«پB
—Fگl‚©‚ç‚جژ؟–â‚à‘½‚¢‚ج‚إپAŒآگl“I‚ب”²‚«ڈo‚µ•û–@‚ًڈ‚µپB
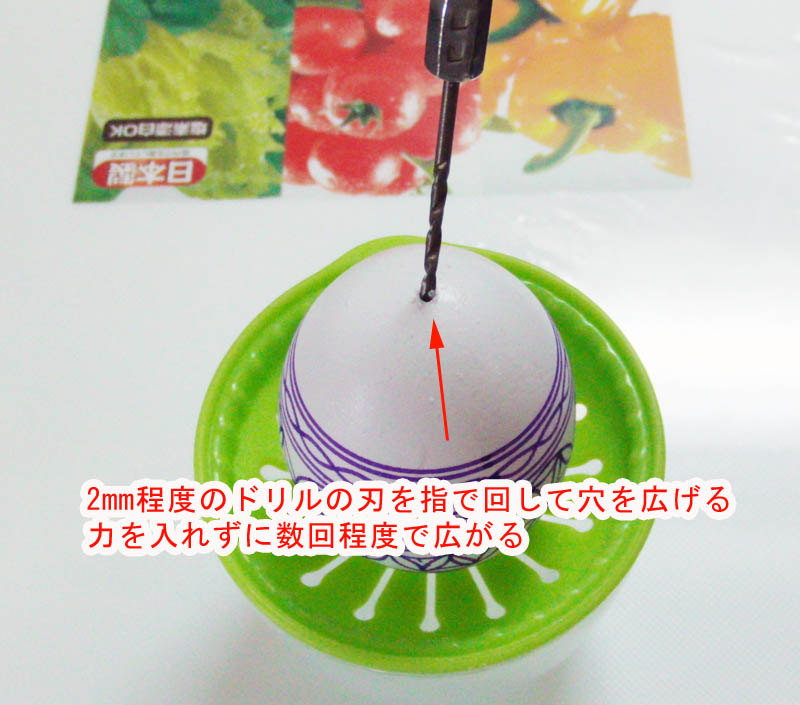
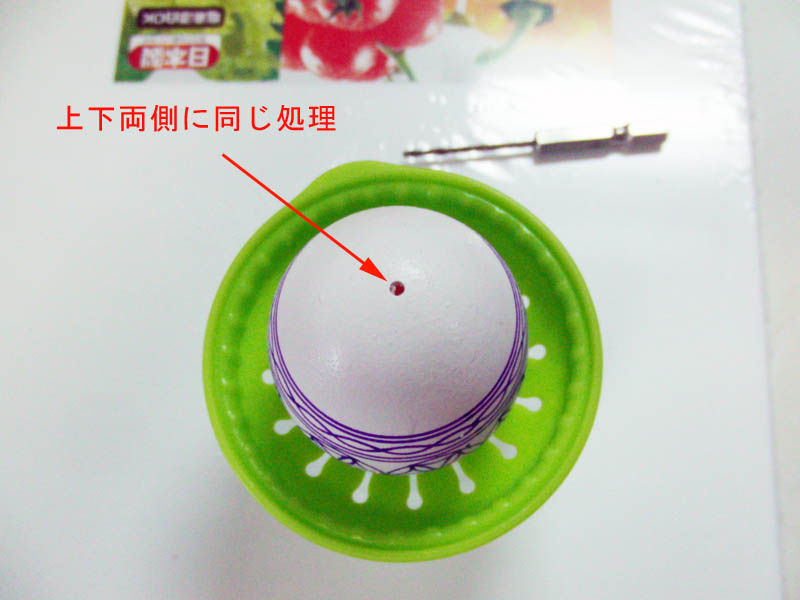
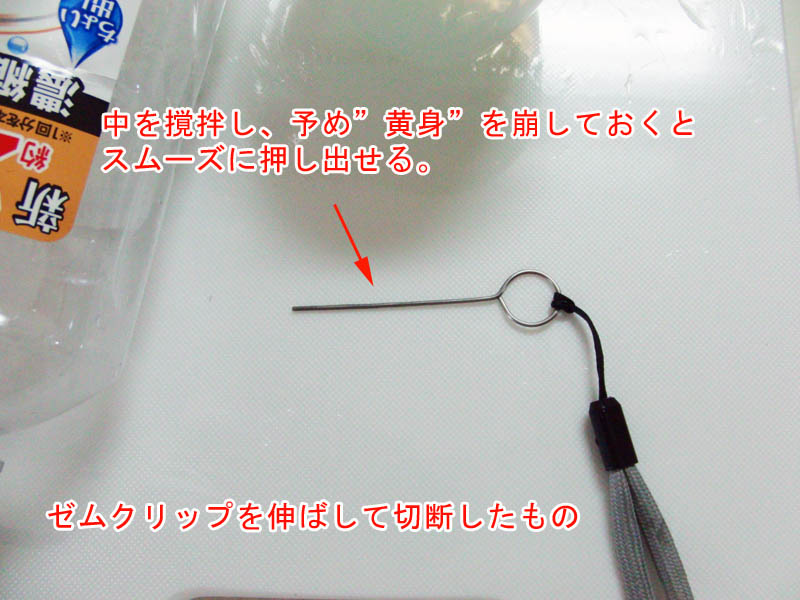
Œٹ‚ ‚¯—p‚ج‰ں‚µƒsƒ“‚ئپAŒٹ‚ًچL‚°‚邽‚ك‚ة2mm’ِ“x‚جƒhƒٹƒ‹‚ً—pˆسپB
پiŒٹ‚جٹg’£ژ‚ةمY—ي‚ب‰~Œ`‚ً•غ‚ؤ‚éپBپj
ڈ‚µ‘ه‚«‚ك‚جƒyƒbƒgƒ{ƒgƒ‹‚جٹW‚ة‚Tƒ~ƒٹ’ِ“x‚جŒٹ‚ًٹJ‚¯پAگ…“¹—p‚ب‚ا‚جOƒpƒbƒLƒ“‚ًƒOƒ‹پ[ƒKƒ“‚ب‚ا‚إ“\‚è•t‚¯پA‹َ‹C‰ں‚µڈo‚µ—p‚ئگôڈٍ—p‚ج2‚آ‚ً—pˆس‚µ‚ؤ‚¨‚پBپi‹ك‚‚جƒzپ[ƒ€ƒZƒ“ƒ^پ[‚ب‚ا‚إژè‚ة“ü‚éپj
‘µ‚¦‚éƒcپ[ƒ‹
Œ»چفژg—p’†‚جƒyƒbƒgƒ{ƒgƒ‹

ƒOƒ‹پ[ƒKƒ“‚إگع’…‚µ‚½گ…“¹—pƒpƒbƒLƒ“پB
‚ ‚é’ِ“x‚ج‹C–§‚ھ•غ‚ؤ‚ê‚خ‰½‚إ‚à—ا‚¢پB

’†گg‚ج”²‚¯‚½ٹk‚ح‘§‚ًگپ‚«‚©‚¯‚邾‚¯‚إ“]‚ھ‚é‚ظ‚اŒy‚¢پI

ژہچغ‚ةƒ^ƒ}ƒS‚ج’†گg‚ج”²‚«ڈo‚·چى‹ئ‚ض‚ئ‚آ‚أ‚پEپE
|
|
|
|
ژہ‚ة‰ü—ا‚·‚ׂ«“_‚ج‘½‚¢ƒ}ƒVƒ“‚¾‚ء‚½‚ھ‚â‚ء‚ئٹ®گ¬پI
ƒRƒ“ƒpƒNƒg‚إگ¸“x‚àگ\‚µ•ھ‚ب‚¢ڈo—ˆ‰h‚¦پB
چ،‰ٌ‚و‚èٹO•”“dŒ¹‚ح “dˆ³‰آ•دƒ^ƒCƒvپi30Wپj‚جAC/DCƒAƒ_ƒvƒ^پ[‚ة•دچXپB
ٹ®گ¬ژتگ^‰،

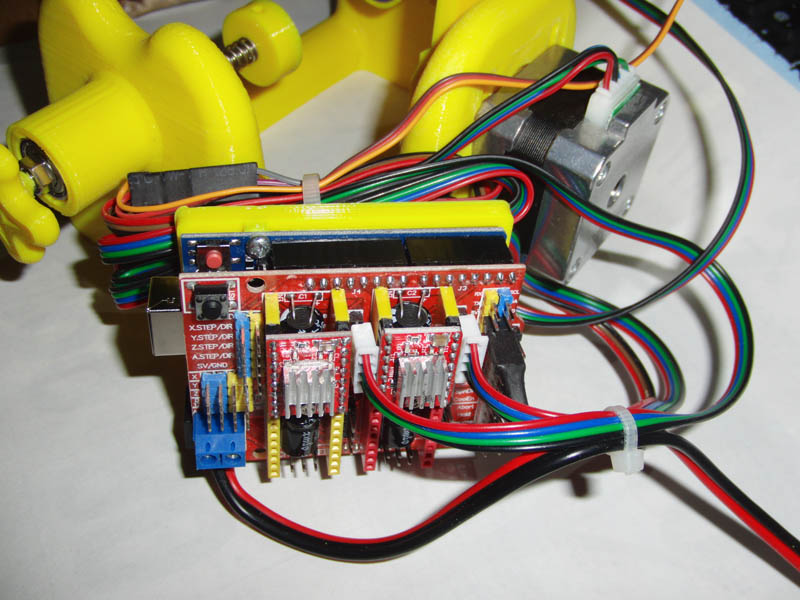
ژg‚¢ٹµ‚ꂽ CNC SHIELD
ڈم–ت‚©‚ç

”zگü—ق‚ح‘©‚ة‚µ‚ؤŒ‹‘©
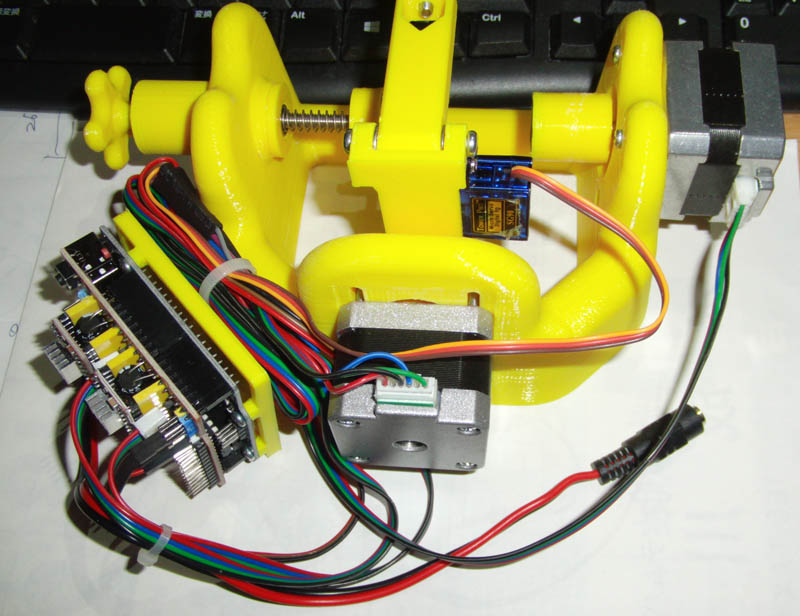
ƒeƒXƒgƒvƒٹƒ“ƒg‚حڈ‰‰ٌ‚©‚狶‚¢–³‚µپI
ڈ‡’²پI
ژ©گM‚ًژ‚ء‚ؤٹ®گ¬‚µ‚½‚ح‚¸‚جƒ}ƒVƒ“‚ھƒXƒCƒbƒ`ƒIƒ“‚إ‚ـ‚³‚©‚جƒoƒCƒuƒŒپ[ƒ^پ[‚ةپI
‰ك‹ژ‚ة”j‰َ‚µ‚½ƒhƒ‰ƒCƒoپ[‚ً‚»‚ج‚ـ‚ـچفŒة‚ئچ¬‚؛‚ؤ‚µ‚ـ‚ء‚ؤ‚¢‚½‚ج‚ً‚·‚ء‚©‚è–Y‚ê‚ؤ‚¢‚½پB
گ»چى‹Lک^‚حŒم“ْپi•تٹظ‚©‚بپHپj
“Y•tƒtƒ@ƒCƒ‹
|
|
|
|
ƒIƒٹƒWƒiƒ‹‚ج‚ـ‚ـ‚إ‚حگFپX‚ب–â‘è‚ھ”گ¶‚·‚邽‚كگڈڈٹ‚ً‰ü‘¢پB
‚ ‚ئ‚إ‚ـ‚ئ‚ك‚é‚ئ‚µ‚ؤگ»چى‚ج“r’†Œo‰كژتگ^‚ج‚فپB
–ع•W‚حچ‚گ¸“xچ‚‘¬ƒvƒٹƒ“ƒg‚ھ‰آ”\‚بƒ}ƒVƒ“پIپiˆس‹Cچ‚ف‚¾‚¯پj
”w–تپBپ@ƒ{پ[ƒg—قˆبٹO‚جƒtƒŒپ[ƒ€‚ح‚ظ‚عٹ®گ¬پI

ƒtƒچƒ“ƒg‚جگط‚蔲‚«پB
Oƒٹƒ“ƒO‚ة‚و‚éƒ^ƒ}ƒS‚جƒLƒƒƒbƒ`‹ïچ‡‚à–€ژCŒWگ”‚ً‘ه‚«‚‚ئ‚ê‚ؤ—اچDپB
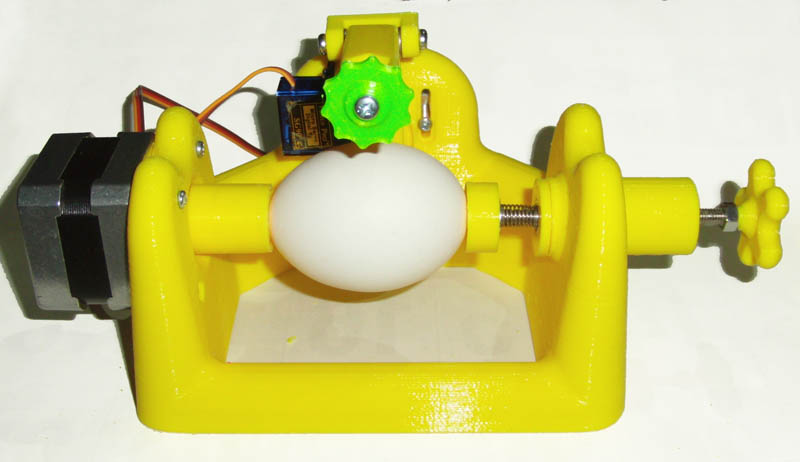
‰ü‘¢ƒyƒ“ƒAپ[ƒ€‚ًڈم‚°‚½ڈَ‘شپBپ@—V‚ر‚ب‚µ‚إƒXƒ€پ[ƒYپB

EggBotڈم•”
‰E‘¤Eggژَ‚¯ژ²ƒAƒWƒƒƒXƒ^پ[‚حƒXƒpƒ“‚¢‚ء‚د‚¢‚ةچL‚°‚½ƒ_ƒuƒ‹ƒxƒAƒٹƒ“ƒOپB

ˆê“ْ‚إٹ®گ¬‚³‚¹‚é—\’è‚ھ–{‘ج‰ü‘¢‚ئ’²گ®‚ةژv‚¢‚ج‚ظ‚©ژ肱‚¸‚ء‚½پI
گ«”\“I‚ةƒvƒٹƒ“ƒg‚إ‚«‚éƒTƒCƒY‚ةگ§Œہ‚ح‚ ‚é‚à‚ج‚جپA‚½‚ـ‚²SƒTƒCƒY‚©‚ç
LƒTƒCƒY‚ـ‚إƒJƒoپ[‚إ‚«‚ê‚خ—ا‚¢پB
ƒ{پ[ƒg•ز‚ة‚آ‚أ‚پEپE
|
|
|
|
ƒtƒŒپ[ƒ€–{‘ج‚ةچ‡‚ي‚¹‚ؤچفŒةƒpپ[ƒc‚©‚çژg‚¦‚»‚¤‚ب‚à‚ج‚ًڈE‚¢ڈW‚ك‚éپB
‚ا‚ê‚ھ‰½ڈˆ‚ة•K—v‚بƒpپ[ƒc‚ب‚ج‚©–¢ٹm”FپB
‚ب‚ج‚إ‚ئ‚è‚ ‚¦‚¸‘Sƒpپ[ƒc‚ًƒvƒٹƒ“ƒgپB
FAN‚ھژ~‚ـ‚ء‚ؤŒ©‚¦‚é‚ھپA100%‚جƒtƒ‹‰ٌ“]پI
ژه‚ب“dژqƒpپ[ƒcپB
چفŒةڈˆ•ھ‚ب‚ج‚إ‹Kٹi‚à‘µ‚ء‚ؤ‚¢‚ب‚¢پBپiƒTƒCƒY‚ج‚ف“¯‹Kٹiپj
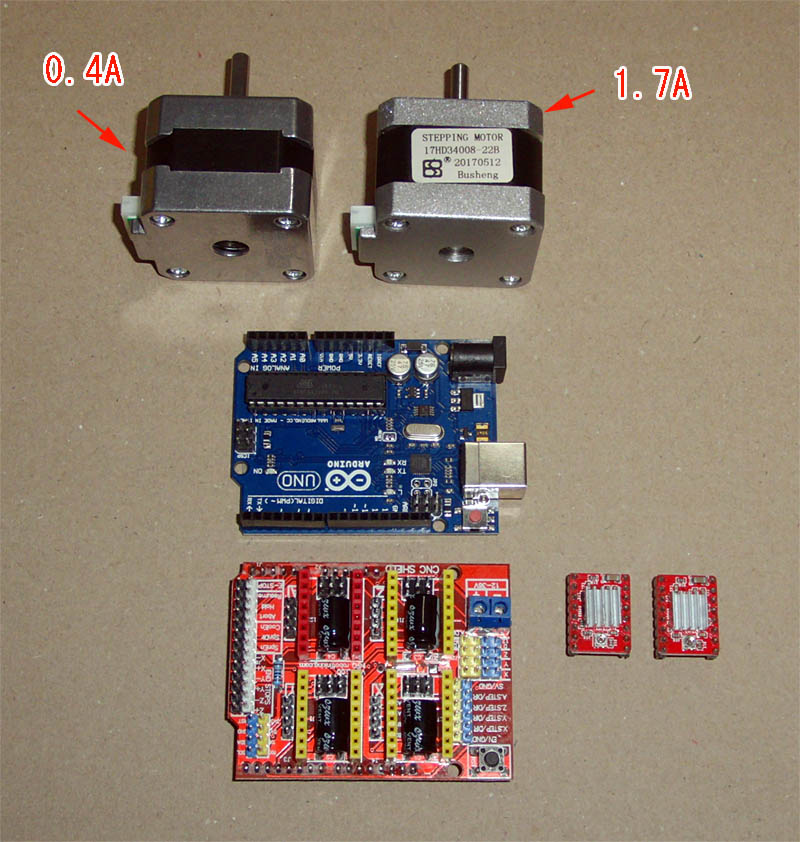
NEMA17ƒXƒeƒbƒsƒ“ƒOƒ‚پ[ƒ^پ[‚حپA چ¶‘¤‚ھ0.4A‚ئ ‰E‘¤1.7A
A4988ƒhƒ‰ƒCƒo‚جپA‚»‚ꂼ‚ê‚ج‹Kٹi‚ة‰‚¶‚½’²گ®‚ھ•K—v‚ة‚ب‚éپB
ƒ{پ[ƒh‚حپA ARDUINO UNO‚ئ CNC SHIELD‚ً—ک—p
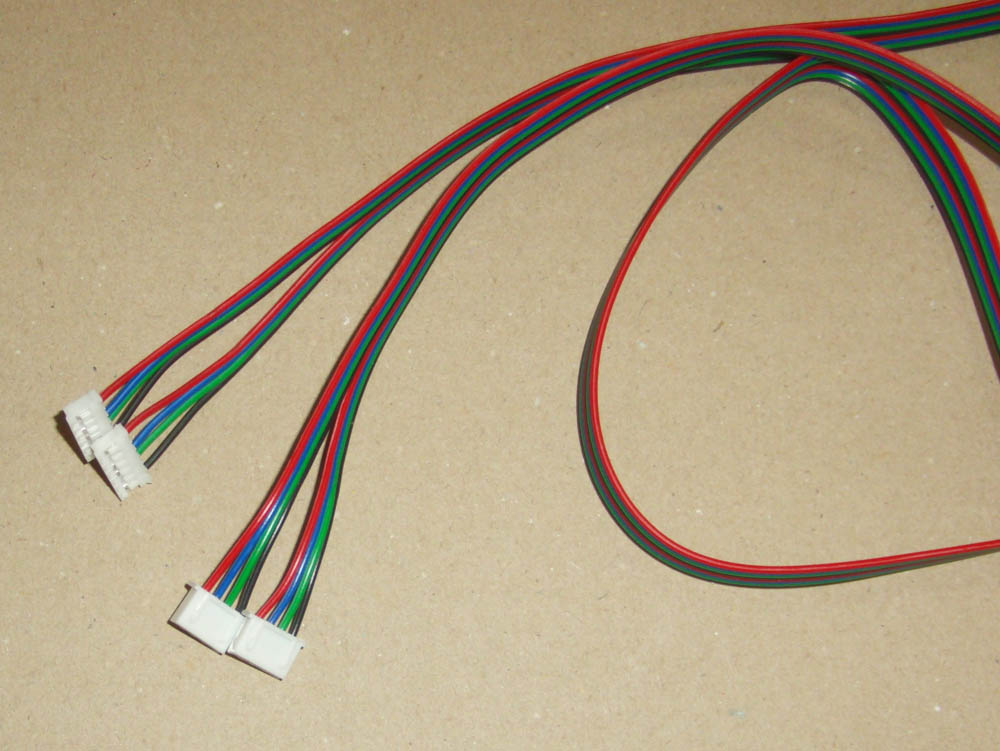
NAMA17—p‚جگع‘±ƒPپ[ƒuƒ‹پB
Amazon‚إ’چ•¶‚µ‚½‚ھپA‚ ‚è‚ھ‚؟‚ب’چ•¶ƒ~ƒXپI
•½چs”z’uپi‘خپj‚جƒPپ[ƒuƒ‹‚ھ‘—‚ç‚ꂽ‚«‚½پB
•ذ‘¤’[ژq‚ھپuگشپAگآپA—خپAچ•پv‚¾‚ئ‚à‚¤•ذ•û‚ج’[ژq‚حپuگشپAچ•پAگآپA—خپv‚ة‚ب‚ç‚ب‚¢‚ئSHIELD‚ةگع‘±‚µ‚½ƒoƒCƒ|پ[ƒ‰Œ^ƒXƒeƒbƒpپ[ƒ‚پ[ƒ^پ[‚حگ³ٹm‚بگU‚é•‘‚¢‚ة‚ب‚ç‚ب‚¢پB
PIN‚ًٹO‚µ‚ؤچؤ”z’u‚·‚é‚©پA“r’†گط’f‚µ‚ؤƒnƒ“ƒ_‚ً•t‚¯’¼‚·‚©پEپEپEپB
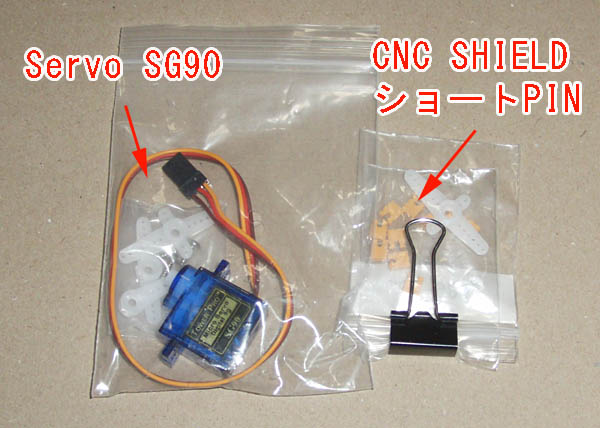
‚¨‚ب‚¶‚ف پuSG90 Servoپv‚ئپA CNC SHIELD‚جƒXƒeƒbƒpپ[•ھ‰ً”\پuLOWپv‚ئپuHIپv‚ًŒˆ’è‚·‚éƒVƒ‡پ[ƒgPIN
SHIELD‚¾‚¯‚ً’چ•¶‚µ‚ؤ‚àPIN‚ھ•t‘®‚µ‚ؤ‚¢‚ب‚©‚ء‚½‚ج‚إ•ت“r’چ•¶‚µ‚½پB
3Dƒvƒٹƒ“ƒ^پ[‚ًگ»چى‚·‚éچغپA6mm‚جƒgƒŒƒC‚ةچ¬“ü‚µ‚ؤ‚¢‚½5mm‚ج’èژعƒ{ƒ‹ƒg‚ً‚»‚ج‚ـ‚ـŒë‚ء‚ؤچw“üپB
ˆê–{”ƒ‚¢‚·‚é‚ئ‚«‚ج—ژ‚ئ‚µŒٹ‚ة‚ـ‚ٌ‚ـ‚ئ—ژ‚؟‚½پB
ژw’è‚جƒpپ[ƒc‚ح3mm‚¾‚ھپAچ،‰ٌ‚ح‚±‚ê‚ًژg—pپB
ˆê‘جŒ^‚جƒtƒŒپ[ƒ€‚حƒpپ[ƒcگ”‚ئ’²گ®ƒ–ڈٹ‚ھڈ‚ب‚‚ؤچد‚ق‚ج‚إڈيپXگ»چى‚µ‚½‚©‚ء‚½‚ج‚¾‚ھپAçSçO‚·‚錴ˆِ‚ة‚ب‚ء‚ؤ‚¢‚½‚ج‚ھ‚±‚ج•”•ھپB
ƒ^ƒ}ƒS‚ج•s‹دچt‚ب‘ب‰~‚ةگ}Œ`‚ً•`‚‚ئڈo‚é"‚ن‚ھ‚ف"‚جŒyŒ¸‚ة‚حگâ‘خ•K—v‚بZچ‚’²گ®‹@”\پB

‚آ‚أ‚پEپEپB
|
|
|
|
Œ‹‹اپAچ‚‹@”\‚بƒAƒvƒٹ‚ً’ْ‚ك‚«‚ꂸ“ْ–{Œê‰»ٹ®—¹پB
‚±‚ꂾ‚ئژg‚¦‚éپB

ژہچغ‚ةƒ{پ[ƒh‚ًŒq‚®‚ئ“®چى‚·‚éپB
“Y•t“®‰و‚حƒfپ[ƒ^‚جچىگ¬‚ةٹµ‚ê‚é‚ـ‚إ‚جƒVƒ~ƒ…ƒŒپ[ƒVƒ‡ƒ“پI
“Y•tƒtƒ@ƒCƒ‹
|
|
|
|
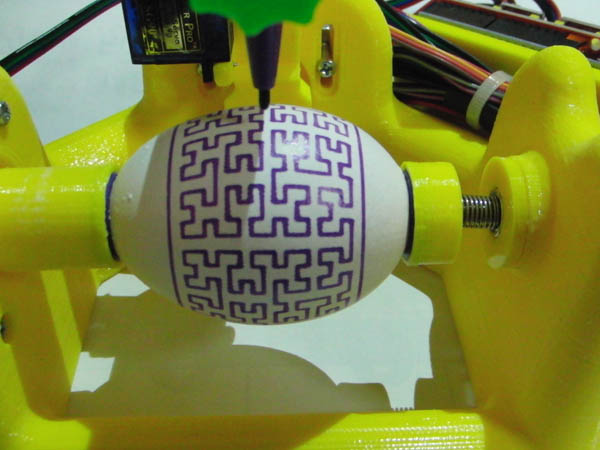
EggBotچؤ”R‚ً”غ’肵‚½‚خ‚©‚肾‚ء‚½‚ھپA”½ڈبپI
‰~“›Œ`‚ةƒVپ[ƒ€ƒŒƒX‚بٹô‰½ٹwگ}Œ`‚ً•`‚¢‚½ڈêچ‡پAƒXƒeƒbƒpپ[‚جŒvژZ‚¾‚¯‚إ‚ح”[“¾‚¢‚©‚ب‚¢Œq‚ھ‚è‚ة‚ب‚é‚ج‚ً‚»‚ج‚ـ‚ـŒ©‰ك‚²‚µ‚ؤ‚«‚½پB
ŒvژZ’ت‚è‚ةƒXƒeƒbƒpپ[‚ً‰ٌ“]‚³‚¹‚ؤ‚àڈd•،‚·‚éچإŒم‚جگü‚ھ‹ح‚©‚ة‘¾‚‚ب‚é–â‘èپI
ڈd•،‚µ‚ؤ•`‰و‚·‚ê‚خ“–‚½‚è‘O‚جŒ‹‰ت‚©‚à‚µ‚ê‚ب‚¢‚ھپA“®‰و‚إŒ©‚éŒہ‚èƒIƒٹƒWƒiƒ‹ƒپپ[ƒJپ[‚ج‚à‚ج‚حٹٹ‚ç‚©‚إڈd•،گü‚ھ‘¾‚‚ب‚ء‚ؤ‚¢‚ب‚¢پB
0.005“x‚جƒXƒeƒbƒpپ[‚جƒYƒŒ‚ً’²گ®‚µ‚ؤ‚±‚ج–â‘è‚ح‰ًŒˆ‚µ‚½پB
ک_‚و‚èڈط‹’‚إ“®‰و‚ًUPپB
“®‰و‚حچإŒم‚ج‚آ‚ب‚¬‚ج•”•ھپB
ƒyƒ“گو‚ھ‘½ڈژC‚ê‚ؤ‘¾‚‚ح‚ب‚ء‚½‚ھپA“ْ–{گ»‚جژO•HPIN 0.1ƒ~ƒٹ
“®‰و‚ح“™‘¬ک^‰و‚ج‚à‚ج‚ًUPپB
“Y•tƒtƒ@ƒCƒ‹
|
|
|
|
‹ةچ׃yƒ“—p‚ة
ArduinoپEServo’x‰„ژٹشپiPWMپj‚ج’²گ®’†
ƒyƒ“ڈمڈ¸‚ً‘پ‚
ƒyƒ“‰؛چ~‚ح’x‚
‘O‚ة‚±‚جƒyƒ“‚ً—ک—p‚µ‚ؤپi0.2ƒ~ƒٹ‚جچ×پjƒ^ƒ}ƒS‚جٹk‚ًٹ„‚ء‚½ŒoŒ±‚ ‚èپI
—lژqŒ©‚ب‚ج‚إƒyƒ“Œإ’èپiڈ‚µƒOƒ‰ƒOƒ‰پIپj‚ئگcڈo‚µ‚ح‚â‚ء‚ؤ‚ب‚¢‚ھ‚¤‚ـ‚‚¢‚ء‚ؤ‚éپB
’†’ِ“x‚ج–ہکH‚¾‚ھپAƒtƒBپ[ƒhƒŒپ[ƒg‚ج’²گ®ژں‘و‚إ‚ح0.1ƒ~ƒٹ‚ج‹ةچ׃yƒ“‚إ‹گ‘ه–ہکH‚ـ‚إ‚¢‚¯‚»‚¤‚¾پB
ƒyƒ“گو‚ج‘¾‚³‚©‚炱‚ج–§“x‚ھŒہٹEپBپ@
“Y•t‚µ‚½zipƒtƒ@ƒCƒ‹پiSVGپj‚حژہچغ‚ةƒvƒٹƒ“ƒg‚ةژg‚ء‚½–ہکHپB
‚¨‚»‚ç‚‚¾‚ھپAچ،–é‚ج—؟—‚إ–³ژœ”ك‚ةٹ„‚ç‚ê‚é—\ٹ´پB
ƒ\پ[ƒX”ُ–Y
config.h “à‚ج’è‹`
#define SERVO_PIN_1 11
#define SERVO_DELAY 75 // (ms) delay between position changes
پ`
// Optional output
#define ALT_PIN 2
پ`
SoftwareServo.h
#ifndef SoftwareServo_h
#define SoftwareServo_h
#include "Arduino.h"
#include
class SoftwareServo
{
private:
uint8_t pin;
uint8_t angle; // in degrees
uint16_t pulse0; // pulse width in TCNT0 counts
uint8_t min16; // minimum pulse, 16uS units (default is 34)
uint8_t max16; // maximum pulse, 16uS units, 0-4ms range (default is 150)
class SoftwareServo *next;
static SoftwareServo* first;
public:
SoftwareServo();
uint8_t attach(int); // attach to a pin, sets pinMode, returns 0 on failure, won't
// position the servo until a subsequent write() happens
void detach();
void write(int); // specify the angle in degrees, 0 to 180
uint8_t read();
uint8_t attached();
void setMinimumPulse(uint16_t); // pulse length for 0 degrees in microseconds, 540uS default
void setMaximumPulse(uint16_t); // pulse length for 180 degrees in microseconds, 2400uS default
static void refresh(); // must be called at least every 50ms or so to keep servo alive
// you can call more often, it won't happen more than once every 20ms
};
#endif
SoftwareServo.cpp
#include "SoftwareServo.h"
SoftwareServo *SoftwareServo::first;
#define NO_ANGLE (0xff)
SoftwareServo::SoftwareServo() : pin(0), angle(NO_ANGLE), pulse0(0), min16(34), max16(150), next(0)
{}
void SoftwareServo::setMinimumPulse(uint16_t t)
{
min16 = t/16;
}
void SoftwareServo::setMaximumPulse(uint16_t t)
{
max16 = t/16;
}
uint8_t SoftwareServo::attach(int pinArg)
{
pin = pinArg;
angle = NO_ANGLE;
pulse0 = 0;
next = first;
first = this;
digitalWrite(pin, 0);
pinMode(pin, OUTPUT);
return 1;
}
void SoftwareServo::detach()
{
for (SoftwareServo **p=&first; *p!=0; p=&((*p)->next) ) {
if (*p == this) {
*p = this->next;
this->next = 0;
return;
}
}
}
void SoftwareServo::write(int angleArg)
{
if (angleArg < 0) angleArg = 0;
if (angleArg > 180) angleArg = 180;
angle = angleArg;
// bleh, have to use longs to prevent overflow, could be tricky if always a 16MHz clock, but not true
// That 64L on the end is the TCNT0 prescaler, it will need to change if the clock's prescaler changes,
// but then there will likely be an overflow problem, so it will have to be handled by a human.
pulse0 = (min16*16L*clockCyclesPerMicrosecond() + (max16-min16)*(16L*clockCyclesPerMicrosecond())*angle/180L)/64L;
}
uint8_t SoftwareServo::read()
{
return angle;
}
uint8_t SoftwareServo::attached()
{
for (SoftwareServo *p=first; p!=0; p=p->next ) {
if (p == this) return 1;
}
return 0;
}
void SoftwareServo::refresh()
{
uint8_t count = 0, i = 0;
uint16_t base = 0;
SoftwareServo *p;
static unsigned long lastRefresh = 0;
unsigned long m = millis();
// if we haven't wrapped millis, and 20ms have not passed, then don't do anything
if (m >= lastRefresh && m < lastRefresh + 20) return;
lastRefresh = m;
for (p=first; p!=0; p=p->next ) if (p->pulse0) count++;
if (count == 0) return;
// gather all the SoftwareServos in an array
SoftwareServo *s[count];
for (p=first; p !=0; p=p->next ) if (p->pulse0) s[i++] = p;
// bubblesort the SoftwareServos by pulse time, ascending order
for(;;) {
uint8_t moved = 0;
for (i = 1; i < count; i++) {
if (s[i]->pulse0 < s[i-1]->pulse0) {
SoftwareServo *t = s[i];
s[i] = s[i-1];
s[i-1] = t;
moved = 1;
}
}
if (!moved) break;
}
// turn on all the pins
// Note the timing error here... when you have many SoftwareServos going, the
// ones at the front will get a pulse that is a few microseconds too long.
// Figure about 4uS/SoftwareServo after them. This could be compensated, but I feel
// it is within the margin of error of software SoftwareServos that could catch
// an extra interrupt handler at any time.
for (i=0; ipin, 1);
uint8_t start = TCNT0;
uint8_t now = start;
uint8_t last = now;
// Now wait for each pin's time in turn..
for (i=0; i
uint16_t go = start + s[i]->pulse0;
// loop until we reach or pass 'go' time
for (;;) {
now = TCNT0;
if (now < last) base += 256;
last = now;
if (base+now > go) {
digitalWrite(s[i]->pin, 0);
break;
}
}
}
}
// ----------Servo’x‰„’²گ®-------------
void moveServo(double value)
{
const int incrementDelay = SERVO_DELAY;
const int currentAngle = servo.read();
servoEnabled = true;
if (value < 0.) value = 0.;
if (value > 180.) value = 180.;
if (value > currentAngle) //
{
for (int angle=currentAngle; angle
{
servo.write(angle);
delay (incrementDelay * 0.6);
SoftwareServo::refresh();
}
}
else if (value < currentAngle) //
if (value < currentAngle) //
{
for (int angle=currentAngle; angle>value; angle--) // ٹp“xƒfƒNƒٹƒپƒ“ƒg
{
servo.write(angle);
delay (incrementDelay * 0.5);
SoftwareServo::refresh();
}
}
{
servo.write((int)value);
}
// nothing to be done if value == currentAngle
}
//پ@-------------------------------------------------------
پ`
“Y•tƒtƒ@ƒCƒ‹
|
|
|
|
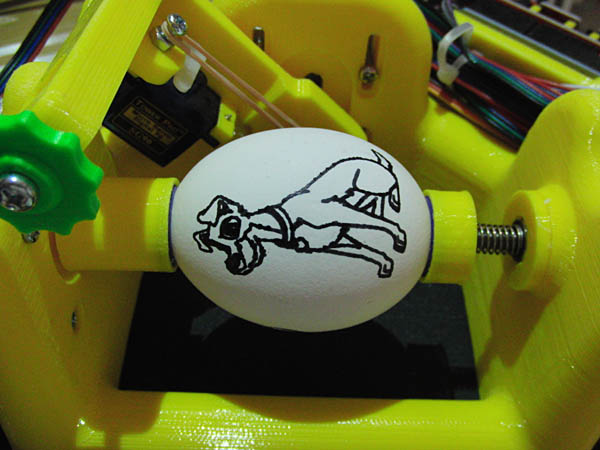
‘Oڈo‚ج“®‰و‚ج‚و‚¤‚ةپuEggBotپv‚ًGRBL‚إ“®‚©‚·‚ئ‚ا‚ٌ‚بٹ´‚¶‚ة‚ب‚é‚ج‚©پHپ@Œںڈط‚µ‚ؤ‚ف‚½‚‚ب‚ء‚½پB
“®‰و‚ةUP‚³‚ê‚ؤ‚¢‚éEggBot‚جƒ\پ[ƒX“à—e‚ھ‰ً‚ç‚ب‚¢‚ج‚إپA•`‰و‚·‚éƒ^ƒ}ƒS–ت‚جƒTƒCƒY‚âƒXƒeƒbƒpپ[‚جگف’è‚ًپuInkscapeپv“à‚جپuLaserƒvƒ‰ƒOƒCƒ“پv‚ة“Kچ‡‚·‚é‚و‚¤پAgrblƒ\پ[ƒX‚ً•دچXپB
پ¦EggBot‚جƒtƒ@پ[ƒ€‚ة—ک—p‚·‚é Servo + ƒ‚پ[ƒ^پ[گ§Œن ‚حپugrbl-servo-masterپvپiGitHub‚إپj
ƒnپ[ƒhƒEƒFƒA‚جڈêچ‡پAکM‚é‚ج‚ھ–ت“|‚ب‚ج‚إŒ»چف‚جچ\گ¬‚ًپiPIN”z’u‚à“¯‚¶پj‚»‚ج‚ـ‚ـ‚إژg‚¤ژ–‚ة‚µ‚½پB
‰؛‚ج‰و‘œ‚ھژہچغ‚ة‰ز“‚³‚¹‚½‚ئ‚«‚جپuگف’èپv‚ةٹض‚·‚é”ُ–Yک^پB
EggBot‚»‚ج‚à‚ج‚حپuInkscape Ver0.91پv‚إ‚ب‚¢‚ئ‚¤‚ـ‚‹@”\‚µ‚ؤ‚‚ê‚ب‚¢‚ج‚إ“ْ–{Œê‰»‚·‚é‚آ‚¢‚إ‚ةچإگV”إ‚ج0.92.4—p‚ة•دچXپB
ژb’è“I‚¾‚ھپAƒXƒeƒbƒpپ[1‰ٌ“]‚ھپuInkscapeپv‚ج•`‰وکg‰،ƒTƒCƒY‚إ100ƒ~ƒٹ‚ة‚ب‚é‚و‚¤گف’èپBپi‚±‚ê‚حŒمپXŒم‰÷‚·‚éژ–‚ةپBƒpƒX‰»‚µ‚½‚ئ‚«‚ج–îˆَ•\ژ¦‚ھژ×–‚‚ة‚ب‚é‚ج‚إ200ƒ~ƒٹ‚ة‚·‚ׂ«پj
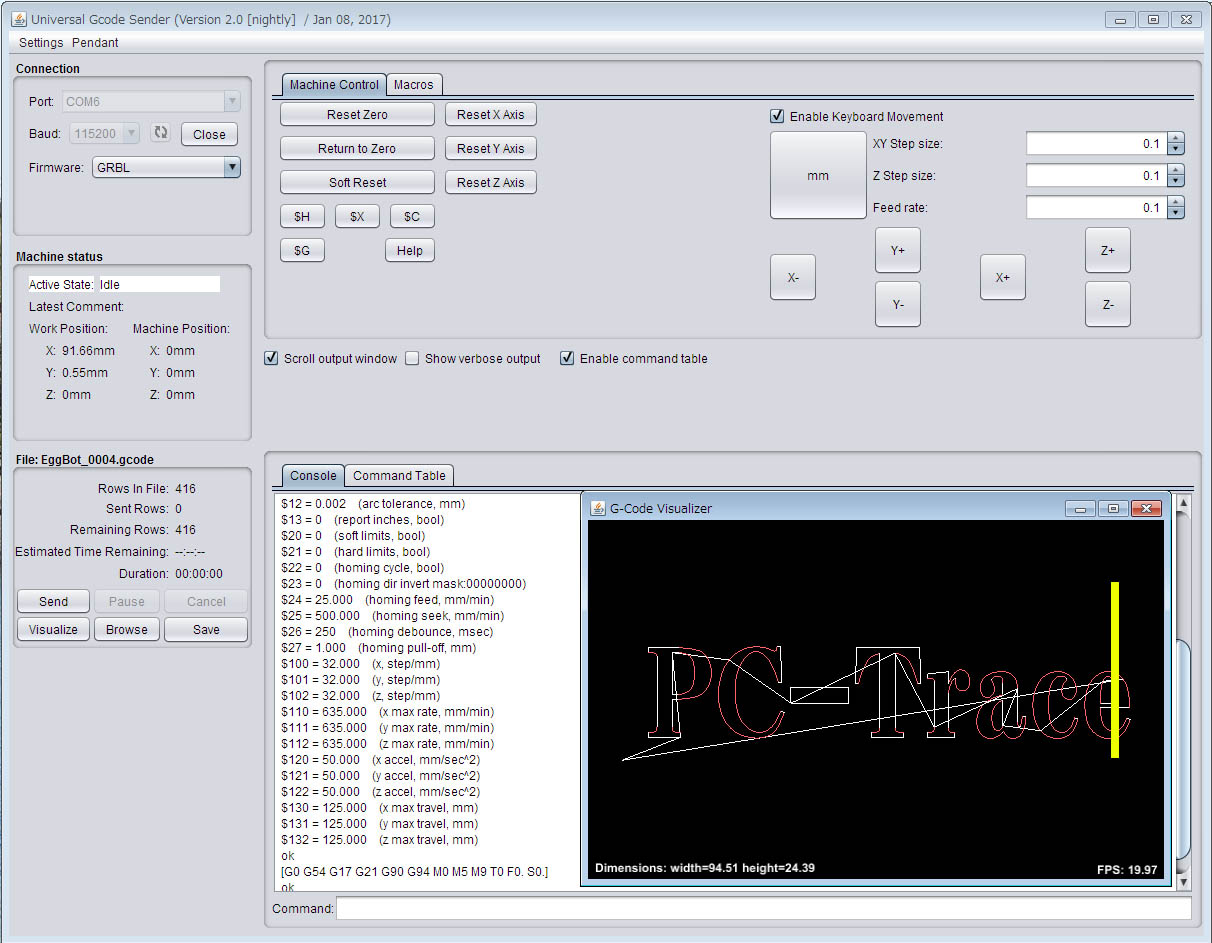
چ،‰ٌ‚حEggBot—pGCODE‚جڈo—حپiچ¶‘¤‚جƒ_ƒCƒAƒچƒOپj‚ًژg‚ي‚¸Laser_plugin‚إڈo—حپB
grbl‚جEggBot‚ةچ‡‚ي‚¹‚½ٹeƒXƒeƒbƒpپ[‚جگف’è’lپiژb’è“Iپj
GRBL‚حƒRƒ“ƒgƒچپ[ƒ‰پ[‚جژي—ق‚ھ‘½‚‹@”\‚àڈ[ژہ‚µ‚ؤ‚¨‚èچ،Œم‚حGRBL‚إ“ˆê‚µ‚½•û‚ھٹo‚¦‚éژ–‚ھڈ‚ب‚‚ؤ‚·‚ف‚»‚¤پB
ژQچlƒTƒCƒgپF
https://github.com/grbl/grbl/wiki/Connecting-Grbl
|
|
|
|
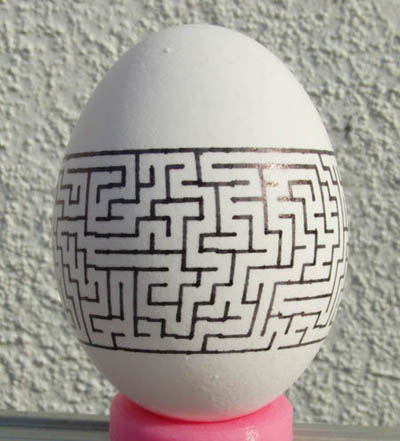
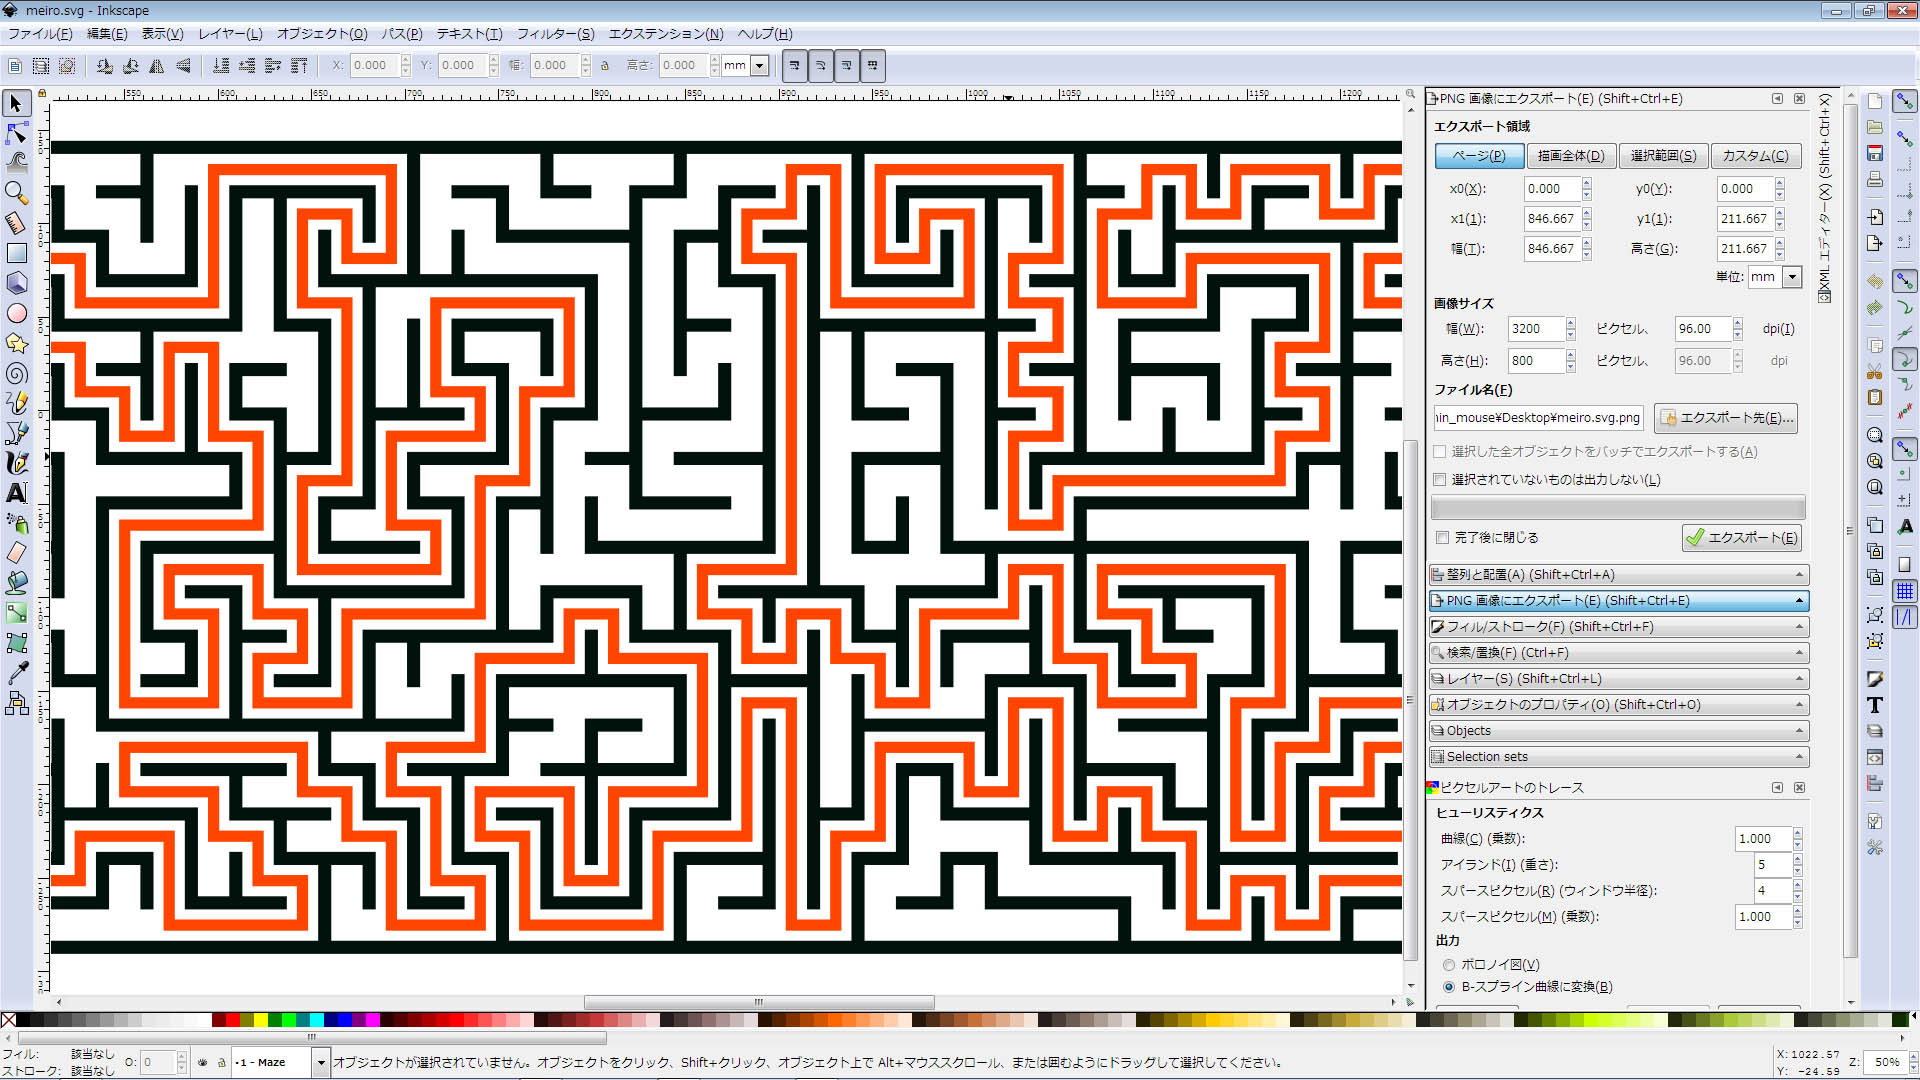
Œآگl“I‚بƒeƒXƒgپF
Inkscape‚ج–ہکHƒvƒ‰ƒOƒCƒ“گ®”ُ’†پBپ@Inkscape0.92.3 “®‚¢‚½پB
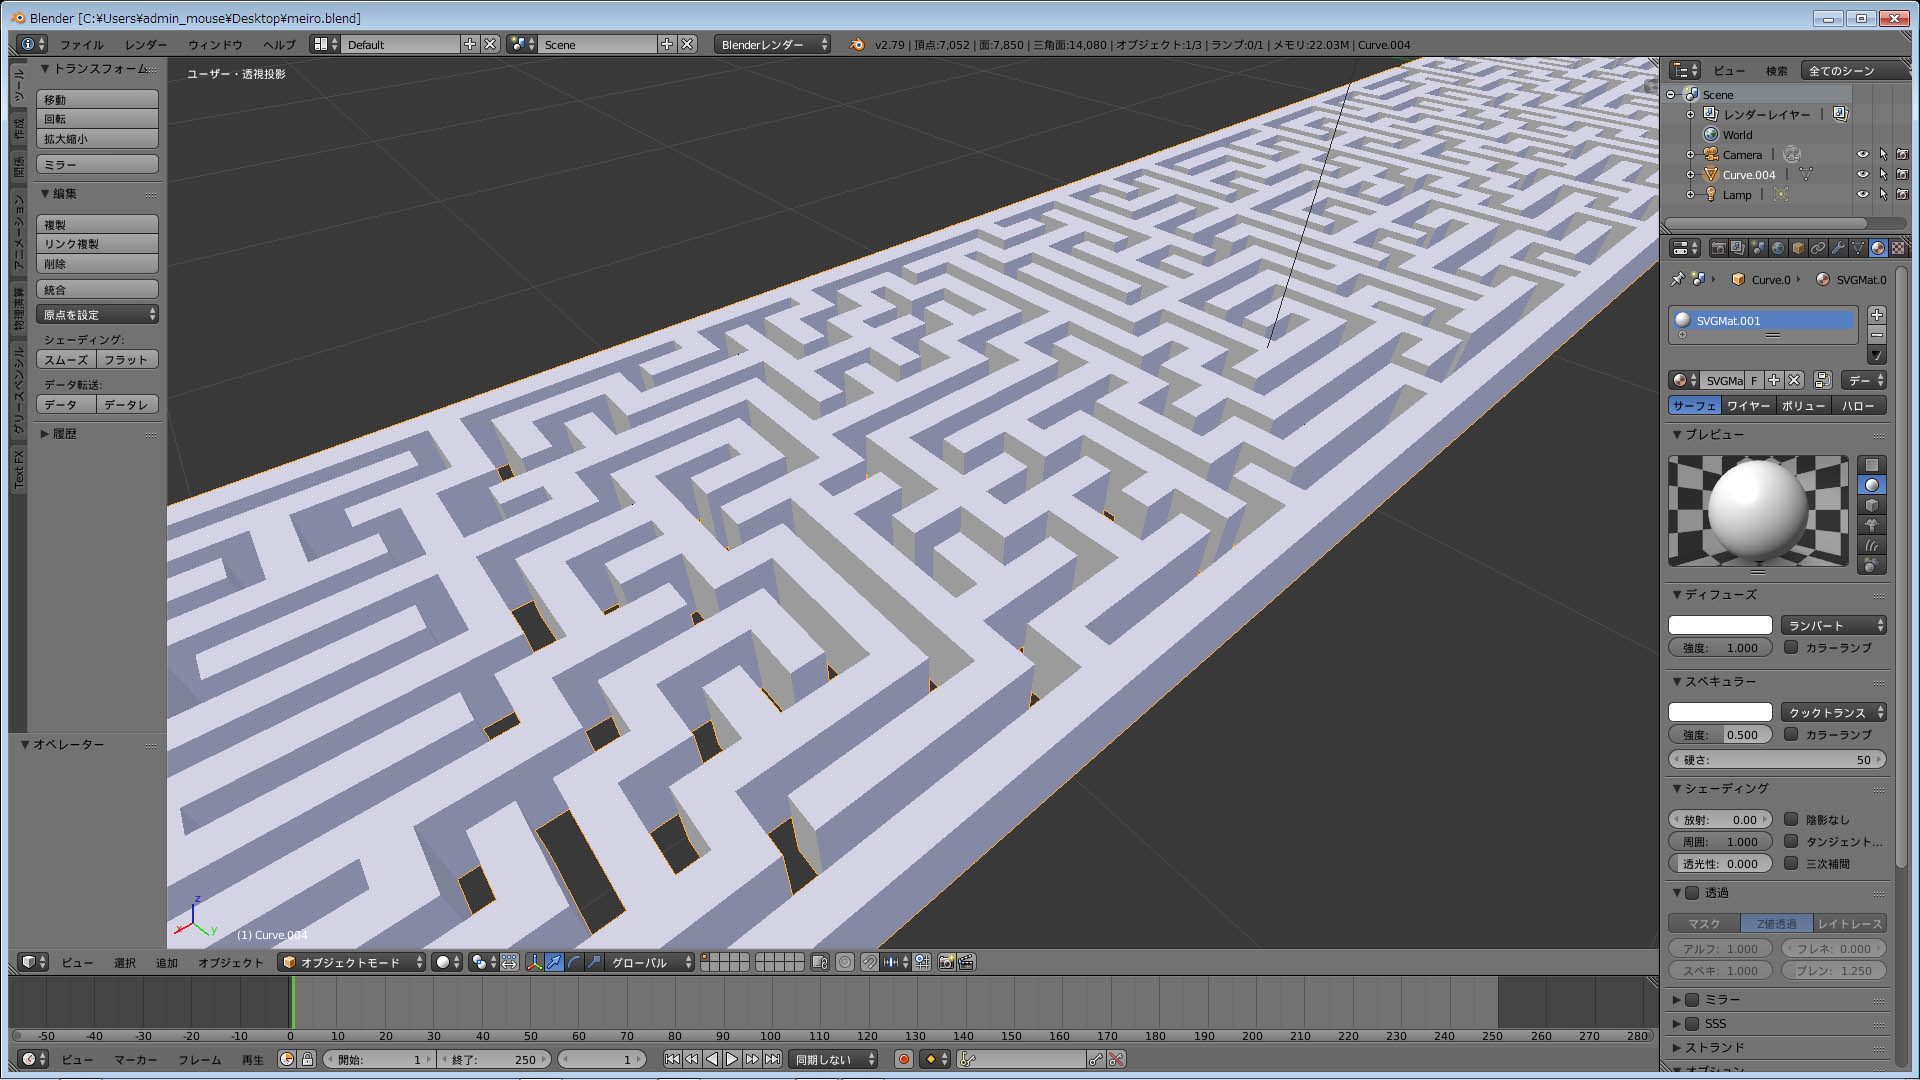
Inkscape‚©‚çBlender‚ةˆع‚µ‚ؤ—§‘ج‰»
‚؟‚ب‚ف‚ةڈم‚جƒpƒ^پ[ƒ“‚ئ‚ح•ت•¨پBپi‚±‚؟‚ç‚حچإڈ‰‚جƒeƒXƒgپj
‰،’·‚ب‚ج‚ح‰~“›‚إ’[پX‚ھ‚آ‚ب‚ھ‚é–ہکH‚ة‚ب‚ء‚ؤ‚¨‚èپA‚±‚ê‚ح•½–ت“WٹJ‚µ‚½‚à‚جپB
ƒeƒXƒg‚ب‚ج‚إپEپEپB
PythonپE–ہکHƒ\پ[ƒX
#!/usr/bin/env python
# Draw a cylindrical maze suitable for plotting with the Eggbot
# The maze itself is generated using a depth first search (DFS)
# Written by Daniel C. Newman for the Eggbot Project
# Improvements and suggestions by W. Craig Trader
# 20 September 2010
# Update 26 April 2011 by Daniel C. Newman
#
# 1. Address Issue #40
# The extension now draws the maze by columns, going down
# one column of cells and then up the next column. By using
# this technique, the impact of slippage is largely limited
# the the West and East ends of the maze not meeting. Otherwise,
# the maze will still look quite well aligned both locally and
# globally. Only very gross slippage will impact the local
# appearance of the maze.
#
# Note that this new drawing technique is nearly as fast as
# the prior method. The prior method has been preserved and
# can be selected by setting self.hpp = True. ("hpp" intended
# to mean "high plotting precision".)
#
# 2. Changed the page dimensions to use a height of 800 rather
# than 1000 pixels.
#
# 3. When drawing the solution layer, draw the ending cell last.
# Previously, the starting and ending cells were first drawn,
# and then the solution path itself. That caused the pen to
# move to the beginning, the end, and then back to the beginning
# again to start the solution path. Alternatively, the solution
# path might have been drawn from the end to the start. However,
# just drawing the ending cell last was easier code-wise.
#
# This program is free software; you can redistribute it and/or modify
# it under the terms of the GNU General Public License as published by
# the Free Software Foundation; either version 2 of the License, or
# (at your option) any later version.
#
# This program is distributed in the hope that it will be useful,
# but WITHOUT ANY WARRANTY; without even the implied warranty of
# MERCHANTABILITY or FITNESS FOR A PARTICULAR PURPOSE. See the
# GNU General Public License for more details.
#
# You should have received a copy of the GNU General Public License
# along with this program; if not, write to the Free Software
# Foundation, Inc., 59 Temple Place, Suite 330, Boston, MA 02111-1307 USA
import sys
import array
import random
import math
import inkex
import simplestyle
# Initialize the psuedo random number generator
random.seed()
PLOT_WIDTH = int( 3200 ) # Eggbot plot width in pixels
PLOT_HEIGHT = int( 800 ) # Eggbot plot height in pixels
TARGET_WIDTH = int( 3200 ) # Desired plot width in pixels
TARGET_HEIGHT = int( 600 ) # Desired plot height in pixels
# Add a SVG path element to the document
# We could do this just as easily as a polyline
def draw_SVG_path( pts, c, t, parent ):
if ( pts is None ) or len( pts ) == 0: # Nothing to draw
return
if isinstance( pts, list ):
assert len( pts ) % 3 == 0, "len(pts) must be a multiple of three"
d = "%s %d,%d" % ( pts[0], pts[1], pts[2] )
for i in range( 3, len( pts ), 3 ):
d += " %s %d,%d" % ( pts[i], pts[i+1], pts[i+2] )
elif isinstance( pts, str ):
d = pts
else:
return
style = { 'stroke':c, 'stroke-width':str( t ), 'fill':'none' }
line_attribs = { 'style':simplestyle.formatStyle( style ),'d':d }
inkex.etree.SubElement( parent, inkex.addNS( 'path','svg' ), line_attribs )
# Add a SVG rect element to the document
def draw_SVG_rect( x, y, w, h, c, t, fill, parent ):
style = { 'stroke':c, 'stroke-width':str( t ), 'fill':fill }
rect_attribs = { 'style':simplestyle.formatStyle( style ),
'x':str( x ), 'y':str( y ),
'width':str( w ), 'height':str( h ) }
inkex.etree.SubElement( parent, inkex.addNS( 'rect', 'svg' ),
rect_attribs )
class Maze( inkex.Effect ):
# Each cell in the maze is represented using 9 bits:
#
# Visited -- When set, indicates that this cell has been visited during
# construction of the maze
#
# Border -- Four bits indicating which if any of this cell's walls are
# part of the maze's boundary (i.e., are unremovable walls)
#
# Walls -- Four bits indicating which if any of this cell's walls are
# still standing
#
# Visited Border Walls
# x x x x x x x x x
# W S E N W S E N
_VISITED = 0x0100
_NORTH = 0x0001
_EAST = 0x0002
_SOUTH = 0x0004
_WEST = 0x0008
def __init__( self ):
inkex.Effect.__init__( self )
self.OptionParser.add_option(
"--tab", action="store", type="string",
dest="tab", default="controls",
help="The active tab when Apply was pressed" )
self.OptionParser.add_option(
"--mazeSize", action="store", type="string", dest="mazeSize",
default="MEDIUM", help="Difficulty of maze to build" )
#self.OptionParser.add_option(
# "--hpp", action="store", type="inkbool", dest="hpp", default=False,
# help="Use a faster plotting technique that requires much better plotting precision" )
#self.hpp = self.options.hpp
self.hpp = False
self.w = int( 0 )
self.h = int( 0 )
self.solved = int( 0 )
self.start_x = int( 0 )
self.start_y = int( 0 )
self.finish_x = int( 0 )
self.finish_y = int( 0 )
self.solution_x = None
self.solution_y = None
self.cells = None
# Drawing information
self.scale = float( 25.0 )
self.last_point = None
self.path = ''
def effect( self ):
# These dimensions are chosen so as to maintain integral dimensions
# with a ratio of width to height of TARGET_WIDTH to TARGET_HEIGHT.
# Presently that's 3200 to 600 which leads to a ratio of 5 and 1/3.
if self.options.mazeSize == 'SMALL':
self.w = int( 32 )
self.h = int( 6 )
elif self.options.mazeSize == 'MEDIUM':
self.w = int( 64 )
self.h = int( 12 )
elif self.options.mazeSize == 'LARGE':
self.w = int( 96 )
self.h = int( 18 )
else:
self.w = int( 128 )
self.h = int( 24 )
# The large mazes tend to hit the recursion limit
limit = sys.getrecursionlimit()
if limit < ( 4 + self.w * self.h ):
sys.setrecursionlimit( 4 + self.w * self.h )
maze_size = self.w * self.h
self.finish_x = int( self.w - 1 )
self.finish_y = int( self.h - 1 )
self.solution_x = array.array( 'i', range( 0, maze_size ) )
self.solution_y = array.array( 'i', range( 0, maze_size ) )
self.cells = array.array( 'H', range( 0, maze_size ) )
# Remove any old maze
for node in self.document.xpath( '//svg:g[@inkscape:label="1 - Maze"]', namespaces=inkex.NSS ):
parent = node.getparent()
parent.remove( node )
# Remove any old solution
for node in self.document.xpath( '//svg:g[@inkscape:label="2 - Solution"]', namespaces=inkex.NSS ):
parent = node.getparent()
parent.remove( node )
# Remove any empty, default "Layer 1"
for node in self.document.xpath( '//svg:g[@id="layer1"]', namespaces=inkex.NSS ):
if not node.getchildren():
parent = node.getparent()
parent.remove( node )
# Start a new maze
self.solved = 0
self.start_x = random.randint( 0, self.w - 1 )
self.finish_x = random.randint( 0, self.w - 1 )
# Initialize every cell with all four walls up
for i in range( 0, maze_size ):
self.cells[i] = Maze._NORTH | Maze._EAST | Maze._SOUTH | Maze._WEST
# Now set our borders -- borders being walls which cannot be removed.
# Since we are a maze on the surface of a cylinder we only have two
# edges and hence only two borders. We consider our two edges to run
# from WEST to EAST and to be at the NORTH and SOUTH.
z = ( self.h - 1 ) * self.w
for x in range( 0, self.w ):
self.cells[x] |= Maze._NORTH << 4
self.cells[x + z] |= Maze._SOUTH << 4
# Build the maze
self.handle_cell( 0, self.start_x, self.start_y )
# Now that the maze has been built, remove the appropriate walls
# associated with the start and finish points of the maze
# Note: we have to remove these after building the maze. If we
# remove them first, then the lack of a border at the start (or
# finish) cell will allow the handle_cell() routine to wander
# outside of the maze. I.e., handle_cell() doesn't do boundary
# checking on the cell cell coordinates it generates. Instead, it
# relies upon the presence of borders to prevent it wandering
# outside the confines of the maze.
self.remove_border( self.start_x, self.start_y, Maze._NORTH )
self.remove_wall( self.start_x, self.start_y, Maze._NORTH )
self.remove_border( self.finish_x, self.finish_y, Maze._SOUTH )
self.remove_wall( self.finish_x, self.finish_y, Maze._SOUTH )
# Now draw the maze
# The following scaling and translations scale the maze's
# (width, height) to (TARGET_WIDTH, TARGET_HEIGHT), and translates
# the maze so that it centered within a document of dimensions
# (width, height) = (PLOT_WIDTH, PLOT_HEIGHT)
# Note that each cell in the maze is drawn 2 x units wide by
# 2 y units high. A width and height of 2 was chosen for
# convenience and for allowing easy identification (as the integer 1)
# of the centerline along which to draw solution paths. It is the
# abstract units which are then mapped to the TARGET_WIDTH eggbot x
# pixels by TARGET_HEIGHT eggbot y pixels rectangle.
scale_x = float( TARGET_WIDTH ) / float( 2 * self.w )
scale_y = float( TARGET_HEIGHT ) / float( 2 * self.h )
translate_x = float( PLOT_WIDTH - TARGET_WIDTH ) / 2.0
translate_y = float( PLOT_HEIGHT - TARGET_HEIGHT ) / 2.0
# And the SVG transform is thus
t = 'translate(%f,%f)' % ( translate_x, translate_y ) + \
' scale(%f,%f)' % ( scale_x, scale_y )
# For scaling line thicknesses. We'll typically draw a line of
# thickness 1 but will need to make the SVG path have a thickness
# of 1 / scale so that after our transforms are applied, the
# resulting thickness is the 1 we wanted in the first place.
if scale_x > scale_y:
self.scale = scale_x
else:
self.scale = scale_y
self.last_point = None
self.path = ''
if not self.hpp:
# To draw the walls, we start at the left-most column of cells, draw down drawing
# the WEST and NORTH walls and then draw up drawing the EAST and SOUTH walls.
# By drawing in this back and forth fashion, we minimize the effect of slippage.
for x in range( 0, self.w, 2 ):
self.draw_vertical( x )
else:
# The drawing style of the "high plotting precision" / "faster plotting" mode
# is such that it minimizes the number of pen up / pen down operations
# but at the expense of requiring higher drawing precision. It's style
# of drawing works best when there is very minimal slippage of the egg
# Draw the horizontal walls
self.draw_horizontal_hpp( 0, Maze._NORTH )
for y in range( 0, self.h - 1 ):
self.draw_horizontal_hpp( y, Maze._SOUTH )
self.draw_horizontal_hpp( self.h - 1, Maze._SOUTH )
# Draw the vertical walls
# Since this is a maze on the surface of a cylinder, we don't need
# to draw the vertical walls at the outer edges (x = 0 & x = w - 1)
for x in range( 0, self.w ):
self.draw_vertical_hpp( x, Maze._EAST )
# Maze in layer "1 - Maze"
attribs = {
inkex.addNS( 'label', 'inkscape' ) : '1 - Maze',
inkex.addNS( 'groupmode', 'inkscape' ) : 'layer',
'transform' : t }
maze_layer = inkex.etree.SubElement( self.document.getroot(), 'g', attribs )
draw_SVG_path( self.path, "#000000", float( 1 / self.scale ), maze_layer )
# Now draw the solution in red in layer "2 - Solution"
attribs = {
inkex.addNS( 'label', 'inkscape' ) : '2 - Solution',
inkex.addNS( 'groupmode', 'inkscape' ) : 'layer',
'transform' : t }
maze_layer = inkex.etree.SubElement( self.document.getroot(), 'g', attribs )
# Mark the starting cell
draw_SVG_rect( 0.25 + 2 * self.start_x, 0.25 + 2 * self.start_y,
1.5, 1.5, "#ff0000", 0, "#ff0000", maze_layer )
# And now generate the solution path itself
# To minimize the number of plotted paths (and hence pen up / pen
# down operations), we generate as few SVG paths as possible.
# However, for aesthetic reasons we stop the path and start a new
# one when it runs off the edge of the document. We could keep on
# drawing as the eggbot will handle that just fine. However, it
# doesn't look as good in Inkscape. So, we end the path and start
# a new one which is wrapped to the other edge of the document.
pts = []
end_path = False
i = 0
while i < self.solved:
x1 = self.solution_x[i]
y1 = self.solution_y[i]
i += 1
x2 = self.solution_x[i]
y2 = self.solution_y[i]
if math.fabs( x1 - x2 ) > 1:
# We wrapped horizontally...
if x1 > x2:
x2 = x1 + 1
else:
x2 = x1 - 1
end_path = True
if i == 1:
pts.extend( [ 'M', 2 * x1 + 1, 2 * y1 + 1 ] )
pts.extend( [ 'L', 2 * x2 + 1, 2 * y2 + 1 ] )
if not end_path:
continue
x2 = self.solution_x[i]
y2 = self.solution_y[i]
pts.extend( [ 'M', 2 * x2 + 1, 2 * y2 + 1 ] )
end_path = False
# Put the solution path into the drawing
draw_SVG_path( pts, '#ff0000', float( 8 / self.scale ), maze_layer )
# Now mark the ending cell
draw_SVG_rect( 0.25 + 2*self.finish_x, 0.25 + 2 * self.finish_y,
1.5, 1.5, "#ff0000", 0, "#ff0000", maze_layer )
# Restore the recursion limit
sys.setrecursionlimit( limit )
# Set some document properties
node = self.document.getroot()
node.set( 'width', '3200' )
node.set( 'height', '800' )
# The following end up being ignored by Inkscape....
node = self.getNamedView()
node.set( 'showborder', 'false' )
node.set( inkex.addNS( 'cx', u'inkscape' ), '1600' )
node.set( inkex.addNS( 'cy', u'inkscape' ), '500' )
node.set( inkex.addNS( 'showpageshadow', u'inkscape' ), 'false' )
# Mark the cell at (x, y) as "visited"
def visit( self, x, y ):
self.cells[y * self.w + x] |= Maze._VISITED
# Return a non-zero value if the cell at (x, y) has been visited
def is_visited( self, x, y ):
if self.cells[y * self.w + x] & Maze._VISITED:
return -1
else:
return 0
# Return a non-zero value if the cell at (x, y) has a wall
# in the direction d
def is_wall( self, x, y, d ):
if self.cells[y * self.w + x] & d:
return -1
else:
return 0
# Remove the wall in the direction d from the cell at (x, y)
def remove_wall( self, x, y, d ):
self.cells[y * self.w + x] &= ~d
# Return a non-zero value if the cell at (x, y) has a border wall
# in the direction d
def is_border( self, x, y, d ):
if self.cells[y * self.w + x] & ( d << 4 ):
return -1
else:
return 0
# Remove the border in the direction d from the cell at (x, y)
def remove_border( self, x, y, d ):
self.cells[y * self.w + x] &= ~( d << 4 )
# This is the DFS algorithm which builds the maze. We start at depth 0
# at the starting cell (self.start_x, self.start_y). We then walk to a
# randomly selected neighboring cell which has not yet been visited (i.e.,
# previously walked into). Each step of the walk is a recursive descent
# in depth. The solution to the maze comes about when we walk into the
# finish cell at (self.finish_x, self.finish_y).
#
# Each recursive descent finishes when the currently visited cell has no
# unvisited neighboring cells.
#
# Since we don't revisit previously visited cells, each cell is visited
# no more than once. As it turns out, each cell is visited, but that's a
# little harder to show. Net, net, each cell is visited exactly once.
def handle_cell( self, depth, x, y ):
# Mark the current cell as visited
self.visit( x, y )
# Save this cell's location in our solution trail / backtrace
if not self.solved:
self.solution_x[depth] = x
self.solution_y[depth] = y
if ( x == self.finish_x ) and ( y == self.finish_y ):
# Maze has been solved
self.solved = depth
# Shuffle the four compass directions: this is the primary source
# of "randomness" in the generated maze. We need to visit each
# neighboring cell which has not yet been visited. If we always
# did that in the same order, then our mazes would look very regular.
# So, we shuffle the list of directions we try in order to find an
# unvisited neighbor.
# HINT: TRY COMMENTING OUT THE shuffle() BELOW AND SEE FOR YOURSELF
directions = [Maze._NORTH, Maze._SOUTH, Maze._EAST, Maze._WEST]
random.shuffle( directions )
# Now from the cell at (x, y), look to each of the four
# directions for unvisited neighboring cells
for i in range( 0, 4 ):
# If there is a border in direction[i], then don't try
# looking for a neighboring cell in that direction. We
# Use this check and borders to prevent generating invalid
# cell coordinates.
if self.is_border( x, y, directions[i] ):
continue
# Determine the cell coordinates of a neighboring cell
# NOTE: we trust the use of maze borders to prevent us
# from generating invalid cell coordinates
if directions[i] == Maze._NORTH:
nx = x
ny = y - 1
opposite_direction = Maze._SOUTH
elif directions[i] == Maze._SOUTH:
nx = x
ny = y + 1
opposite_direction = Maze._NORTH
elif directions[i] == Maze._EAST:
nx = x + 1
ny = y
opposite_direction = Maze._WEST
else:
nx = x - 1
ny = y
opposite_direction = Maze._EAST
# Wrap in the horizontal dimension
if nx < 0:
nx += self.w
elif nx >= self.w:
nx -= self.w
# See if this neighboring cell has been visited
if self.is_visited( nx, ny ):
# Neighbor has been visited already
continue
# The neighboring cell has not been visited: remove the wall in
# the current cell leading to the neighbor. And, from the
# neighbor remove its wall leading to the current cell.
self.remove_wall( x, y, directions[i] )
self.remove_wall( nx, ny, opposite_direction )
# Now recur by "moving" to this unvisited neighboring cell
self.handle_cell( depth + 1, nx, ny )
def draw_line( self, x1, y1, x2, y2 ):
if self.last_point is not None:
if ( self.last_point[0] == x1 ) and ( self.last_point[1] == y1 ):
self.path += ' L %d,%d' % ( x2, y2 )
self.last_point = [ x2, y2 ]
elif ( self.last_point[0] == x2 ) and ( self.last_point[1] == y2 ):
self.path += ' L %d,%d L %d,%d' % ( x1, y1, x2, y2 )
# self.last_point unchanged
else:
self.path += ' M %d,%d L %d,%d' % ( x1, y1, x2, y2 )
self.last_point = [ x2, y2 ]
else:
self.path = 'M %d,%d L %d,%d' % ( x1, y1, x2, y2 )
self.last_point = [ x2, y2 ]
def draw_wall( self, x, y, d, dir ):
if dir > 0:
if d == Maze._NORTH:
self.draw_line( 2*(x+1), 2*y, 2*x, 2*y )
elif d == Maze._WEST:
self.draw_line( 2*x, 2*y, 2*x, 2*(y+1) )
elif d == Maze._SOUTH:
self.draw_line( 2*(x+1), 2*(y+1), 2*x, 2*(y+1) )
else: # Mase._EAST
self.draw_line( 2*(x+1), 2*y, 2*(x+1), 2*(y+1) )
else:
if d == Maze._NORTH:
self.draw_line( 2*x, 2*y, 2*(x+1), 2*y )
elif d == Maze._WEST:
self.draw_line( 2*x, 2*(y+1), 2*x, 2*y )
elif d == Maze._SOUTH:
self.draw_line( 2*x, 2*(y+1), 2*(x+1), 2*(y+1) )
else: # Maze._EAST
self.draw_line( 2*(x+1), 2*(y+1), 2*(x+1), 2*y )
# Draw the vertical walls of the maze along the column of cells at
# horizonal positions
def draw_vertical( self, x ):
# Drawing moving downwards from north to south
if self.is_wall( x, 0, Maze._NORTH ):
self.draw_wall( x, 0, Maze._NORTH, +1 )
for y in range( 0, self.h ):
if self.is_wall( x, y, Maze._WEST ):
self.draw_wall( x, y, Maze._WEST, +1 )
if self.is_wall( x, y, Maze._SOUTH ):
self.draw_wall( x, y, Maze._SOUTH, +1 )
# Now, return drawing upwards moving from south to north
x += 1
if x >= self.w:
return
for y in range( self.h - 1, -1, -1 ):
if self.is_wall( x, y, Maze._SOUTH ):
self.draw_wall( x, y, Maze._SOUTH, -1 )
if self.is_wall( x, y, Maze._WEST ):
self.draw_wall( x, y, Maze._WEST, -1 )
if self.is_wall( x, 0, Maze._NORTH ):
self.draw_wall( x, 0, Maze._NORTH, -1 )
# Draw the horizontal walls of the maze along the row of
# cells at "height" y: "high plotting precision" version
def draw_horizontal_hpp(self, y, wall ):
# Cater to Python 2.4 and earlier
# dy = 0 if wall == Maze._NORTH else 1
if wall == Maze._NORTH:
dy = 0
else:
dy = 1
tracing = False
for x in range( 0, self.w ):
if self.is_wall( x, y, wall ):
if not tracing:
# Starting a new segment
segment = x
tracing = True
else:
if tracing:
# Reached the end of a segment
self.draw_line( 2 * segment, 2 * (y + dy),
2 * x, 2 * (y + dy) )
tracing = False
if tracing:
# Draw the last wall segment
self.draw_line( 2 * segment, 2 * (y + dy),
2 * self.w, 2 * (y + dy) )
# Draw the vertical walls of the maze along the column of cells at
# horizonal position x: "high plotting precision" version
def draw_vertical_hpp(self, x, wall ):
# Cater to Python 2.4 and earlier
# dx = 0 if wall == Maze._WEST else 1
if wall == Maze._WEST:
dx = 0
else:
dx = 1
# We alternate the direction in which we draw each vertical wall.
# First, from North to South and then from South to North. This
# reduces pen travel on the Eggbot
if x % 2 == 0: # North-South
y_start, y_finis, dy, offset = 0, self.h, 1, 0
else: # South-North
y_start, y_finis, dy, offset = self.h - 1, -1, -1, 2
tracing = False
for y in range( y_start, y_finis, dy ):
assert 0 <= y and y < self.h, "y (%d) is out of range" % y
if self.is_wall( x, y, wall ):
if not tracing:
# Starting a new segment
segment = y
tracing = True
else:
if tracing:
# Hit the end of a segment
self.draw_line( 2 * ( x + dx ), 2 * segment + offset,
2 * ( x + dx ), 2 * y + offset )
tracing = False
if tracing:
# complete the last wall segment
self.draw_line( 2 * ( x + dx ), 2 * segment + offset,
2 * ( x + dx ), 2 * y_finis + offset )
if __name__ == '__main__':
e = Maze()
e.affect()
“Y•tƒtƒ@ƒCƒ‹
|
|
|
|